


So you bought motorized shades and you’re ready to put them up yourself. Good news: motorized shades installation is a project most homeowners can handle with basic tools, a bit of patience, and the right instructions. No electrical degree required, just steady hands and accurate measurements.
At The Shutter Look, we’ve been installing window treatments across Central Florida for over 23 years, including motorized Neolux shades for homeowners who want push-button control over light and privacy. We handle professional installation every day, so we know exactly where DIY projects succeed, and where they go sideways. That hands-on experience is what this guide is built on.
Below, you’ll find the full breakdown: tools you’ll need, step-by-step mounting instructions, wiring and programming tips, and the common mistakes that lead to crooked brackets or unresponsive motors. Whether you’re installing a single shade in a bedroom or outfitting an entire living area, this guide walks you through the process from unboxing to final adjustment. And if you hit a wall at any point, we’re a phone call away for homeowners in the Central Florida area who’d rather hand it off to a pro.
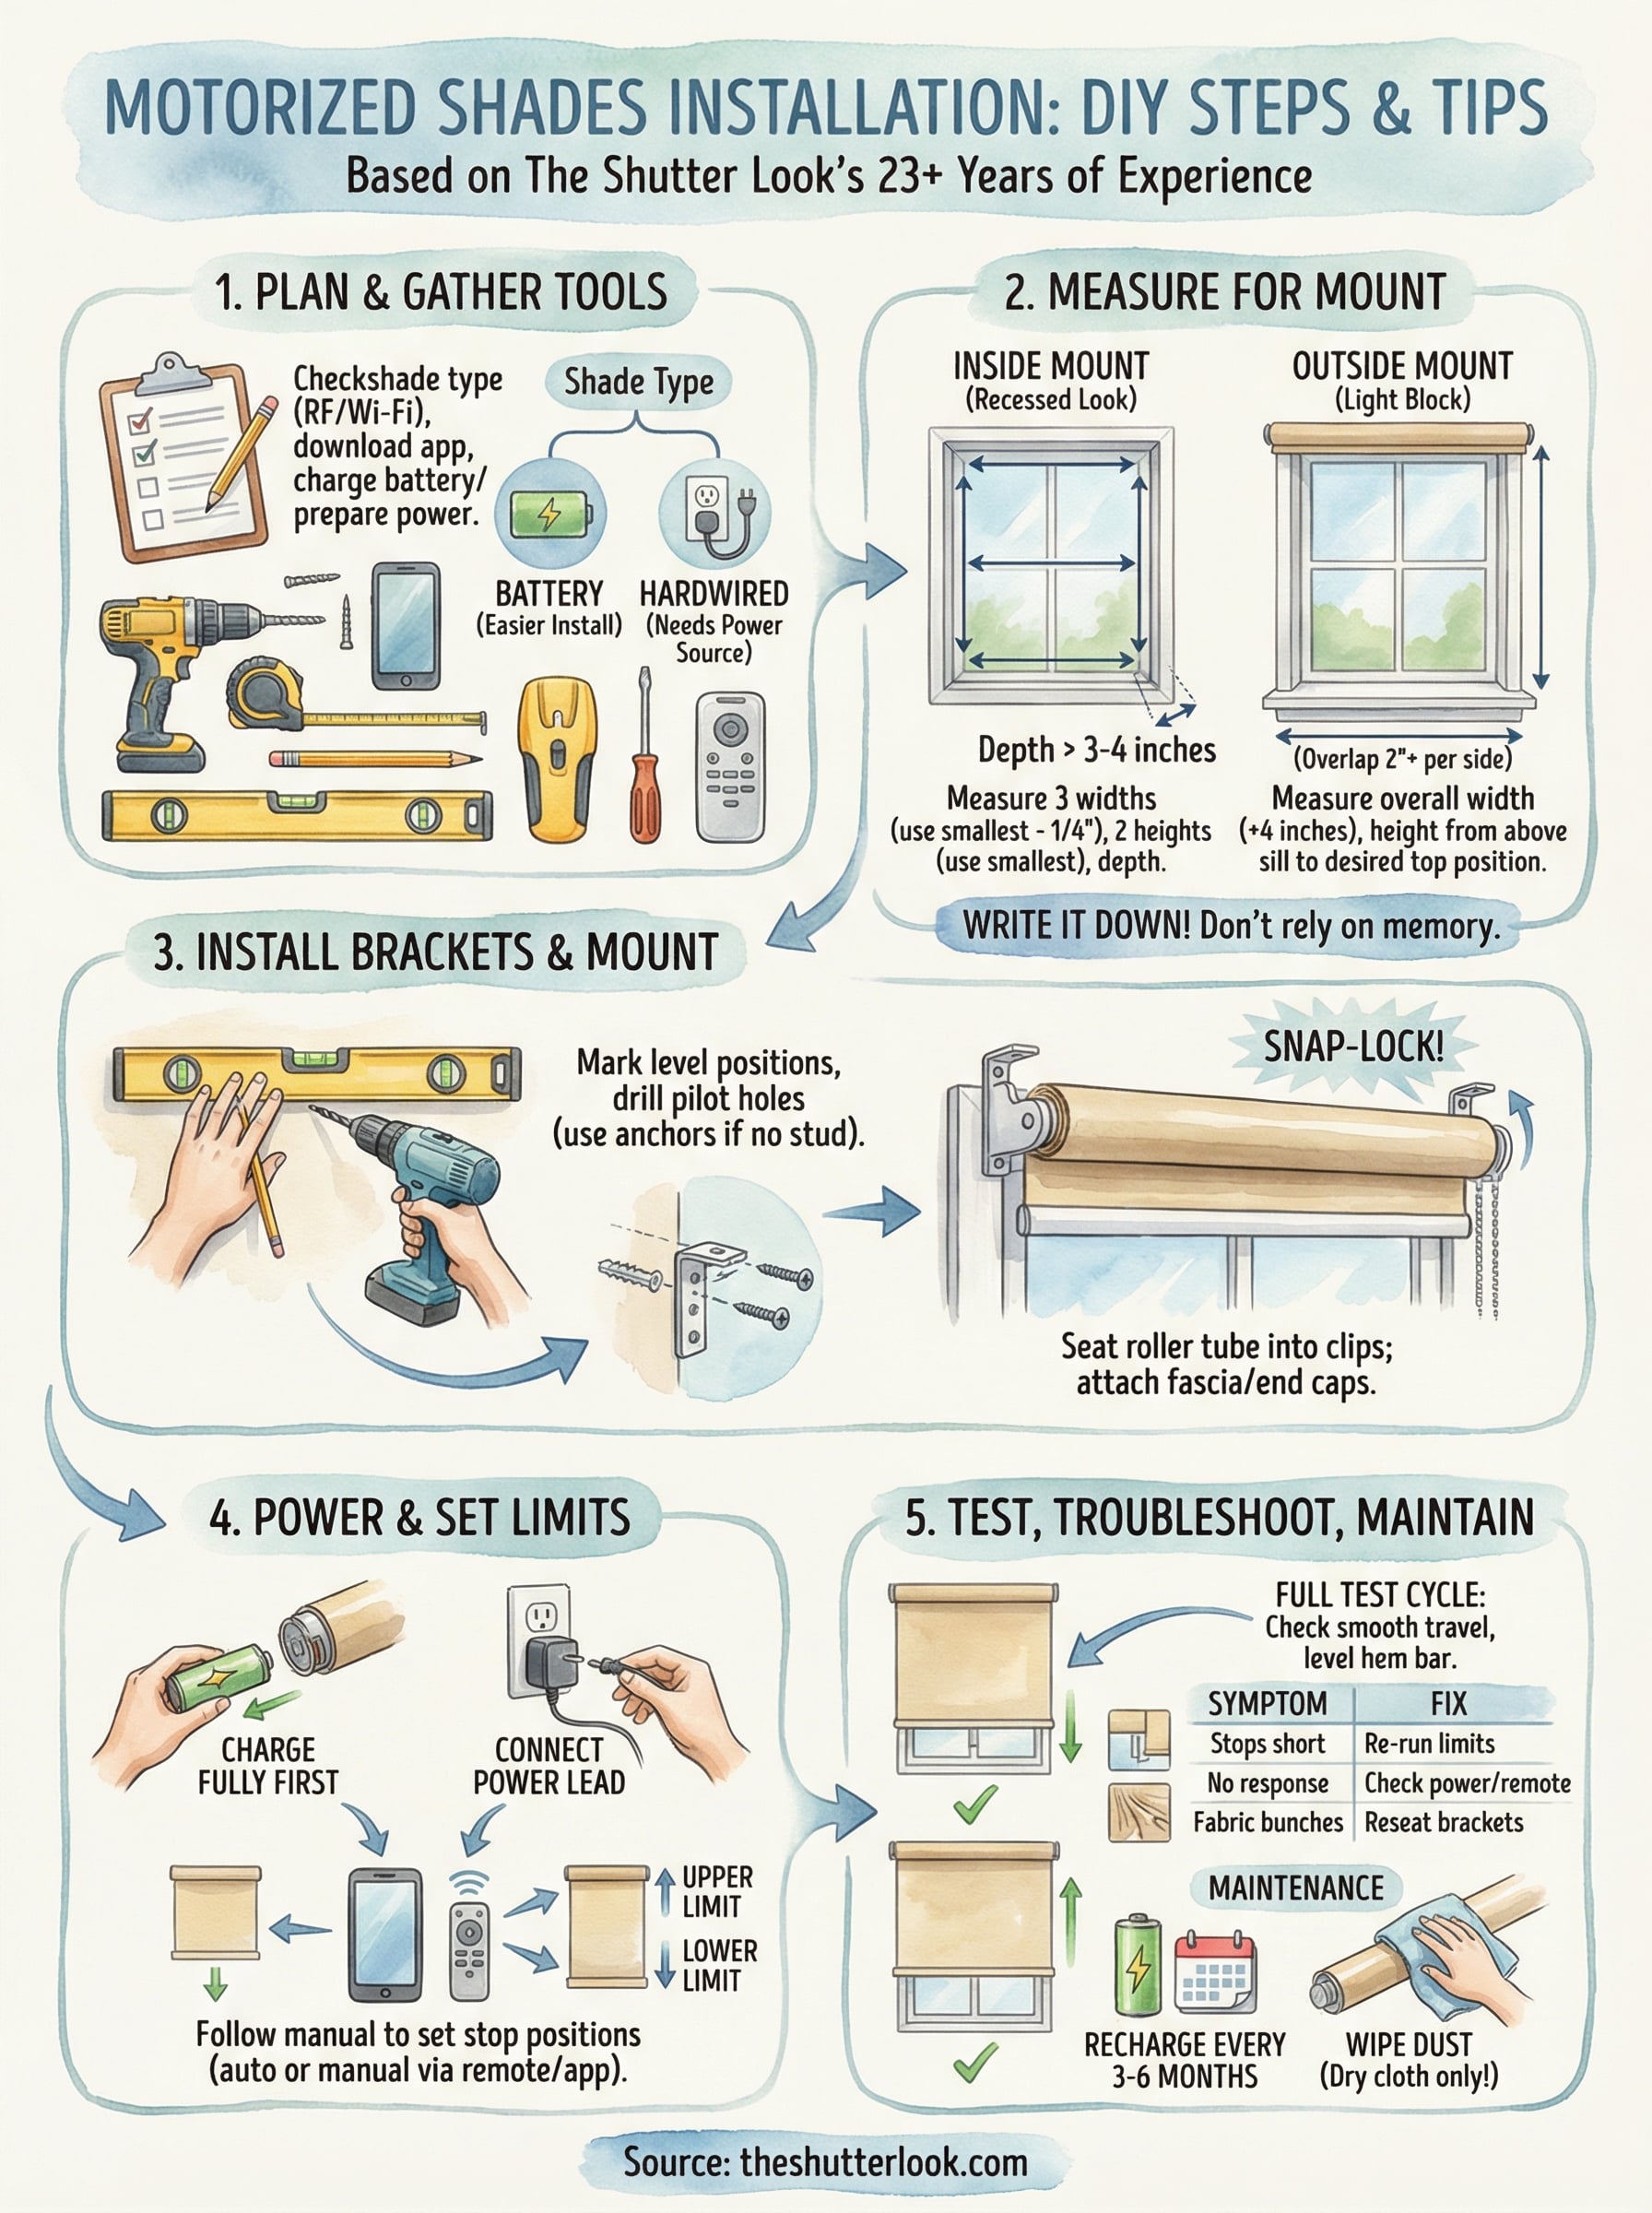
Plan the install and gather tools
Before you touch a wall, spend 15 minutes planning. Most failed motorized shades installation projects come down to one thing: skipping prep. You need to know what type of shade you have, what power source it uses, and whether your window opening calls for an inside or outside mount. Get those details locked in first, and the actual install goes much faster.
Know your shade type before anything else
Motorized shades fall into two main categories based on how they get power: battery-operated and hardwired. Battery-operated models are far easier to install since you don’t need to run wires or involve an electrician. Hardwired shades require a power source near the window, which often means hiring a licensed electrician to add an outlet or run conduit before you start. If your shades are hardwired, sort out that electrical work at least a week before your install day.
Your shade will also communicate with a remote, a wall switch, a smartphone app, or some combination of those. Check the communication protocol your shade uses (most residential shades use RF/radio frequency or Wi-Fi) before you assume everything will pair together out of the box. Download the manufacturer’s app and create your account ahead of time so you’re not scrambling during the install.
If you’re installing hardwired shades in Florida, all electrical work must comply with the National Electrical Code (NEC) and your local county permit requirements.
Tools and materials checklist
Gather everything before you start so you’re not making hardware store runs mid-install. Here’s what you’ll need for a standard motorized shade install:
| Tool / Material | Purpose |
|---|---|
| Power drill with bits | Driving screws into bracket holes |
| Level (at least 24 inches) | Keeping brackets perfectly horizontal |
| Measuring tape (25-foot) | Window width and depth measurements |
| Pencil | Marking bracket positions on the frame |
| Stud finder | Locating wood framing for outside mounts |
| Phillips and flathead screwdrivers | Bracket adjustments and cover clips |
| Ladder or step stool | Reaching high windows safely |
| Manufacturer hardware kit | Brackets, screws, and end caps (included in box) |
| Smartphone or remote | Programming motor limits after mounting |
Most shade boxes include the mounting hardware (brackets, screws, end caps), but the drill, level, and measuring tape are on you. If you’re mounting into drywall with no stud behind it, add wall anchors rated for at least 15 pounds to your list. Motorized shades are heavier than manual shades because of the motor and battery pack sitting inside the roller tube.
Read the manufacturer instructions first
Every motorized shade brand programs the motor limits differently. Somfy, Lutron, and Neolux all use different remote button sequences to set the upper and lower stop positions. If you skip the manual and guess, you risk burning out the motor by over-extending it, or having the shade stop at the wrong point entirely.
Pull up the digital version of your instruction sheet (most brands post these on their product pages) and read through the full process once before you start. Mark the steps that involve motor programming so you know exactly when to pause the physical install and switch to the setup phase. That one habit alone saves a lot of backtracking on install day.
Step 1. Measure for inside or outside mount
The first real decision in any motorized shades installation is choosing between an inside mount and an outside mount. An inside mount fits the shade inside the window frame, giving you a clean, recessed look. An outside mount attaches brackets to the wall or trim above the window opening, which works better when your frame is too shallow for the hardware, or when you want to cover more of the surrounding wall to block light gaps on the sides.
Inside mount: what to measure
For an inside mount, depth is the critical dimension you need to check before anything else. Most motorized shades require at least 3 to 4 inches of inside frame depth to fit the roller tube, motor housing, and mounting brackets without the shade sitting against the glass. Pull out the manufacturer’s spec sheet and confirm the minimum required depth for your specific model before you commit to this mount style.

To get your width measurement, measure across the inside of the window frame at three points: top, middle, and bottom. Use the smallest of the three numbers, then subtract 1/4 inch to give the shade room to travel without rubbing against the sides. For height, measure from the top of the frame down to the sill on both the left and right sides, and again record the smaller number.
Write your measurements down immediately after you take them. Relying on memory between the window and your order form is how costly mistakes happen.
Outside mount: what to measure
With an outside mount, you control the final shade size more freely, which is why it works well when you need maximum light blockage or when the window recess is too shallow for an inside fit. Plan for the shade to extend at least 2 inches beyond the window opening on each side, adding 4 inches to the total width. That overlap prevents light from bleeding through the fabric edges.
For height, measure from where you plan to set the top bracket down to just past the sill. Most installers position the bracket 4 to 6 inches above the window opening. This gives the shade enough clearance to roll up fully above the glass and makes the window look taller when the shade is open.
Step 2. Install brackets and mount the shade
With your measurements confirmed, you’re ready to put hardware into the wall. Bracket placement is the most critical step in any motorized shades installation, because a bracket that’s even slightly off-level will cause the shade to roll unevenly and bind the motor over time. Take your time here, and check level twice before you drill a single hole.
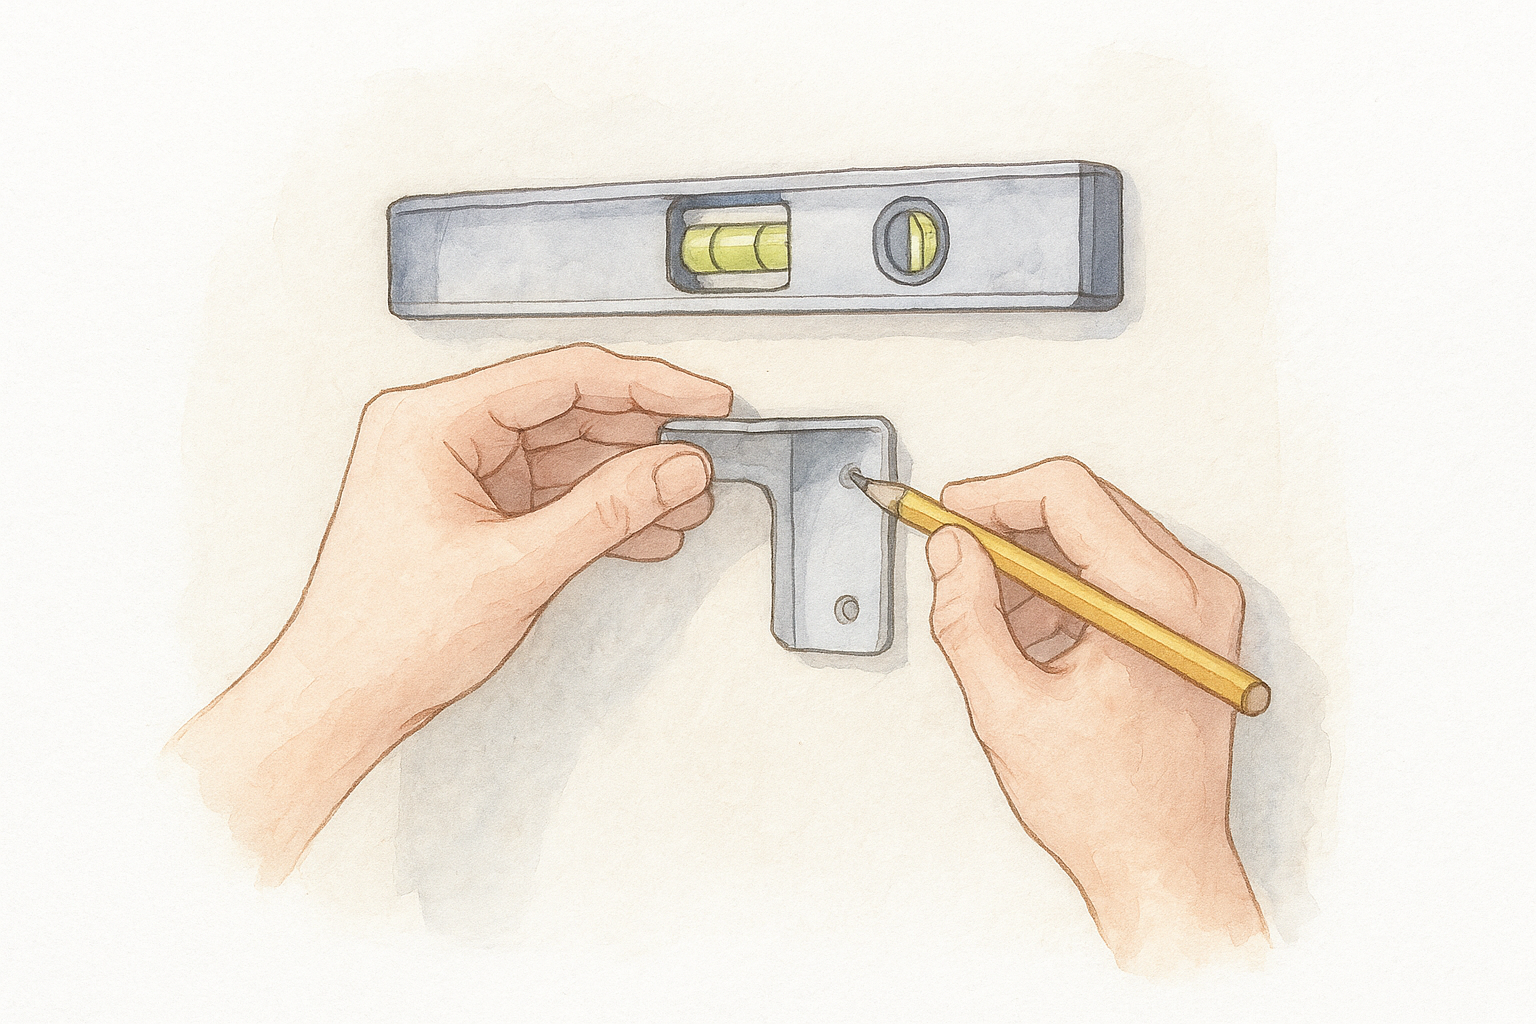
Mark and drill the bracket holes
Hold the first bracket up to the frame or wall and use a pencil to mark the screw hole positions. Then set your level across both bracket positions before you mark the second bracket. Most shades come with two end brackets, and some wider shades (over 72 inches) include a center support bracket to prevent the tube from bowing under the motor’s weight.
If you’re drilling into a stud, use the screws included in the hardware kit. If you’re drilling into drywall with no stud behind it, use wall anchors rated for at least 15 pounds before you set the bracket.
Once your holes are marked, drill pilot holes at each pencil mark. Pilot holes prevent the wood or drywall from cracking and make it much easier to drive the bracket screws straight in. Attach each bracket firmly so there’s no wobble when you tug on it by hand.
Attach the shade to the brackets
Lift the roller tube into the open bracket clips and snap each bracket arm closed over the tube ends. Most bracket systems use a snap-lock design, so you’ll hear or feel a click when the tube seats correctly. If one side feels loose, remove it and reseat it before closing the clip fully.
After both ends are locked in, install any decorative fascia or end caps your shade came with. These slide or clip over the brackets and tube ends to cover the hardware. The fascia is cosmetic, but it also keeps dust out of the motor housing over time, which matters for long-term reliability. Give the full assembly a gentle tug side to side to confirm nothing shifts, then move on to powering the motor.
| Bracket Type | When to Use |
|---|---|
| Standard end bracket | All installs, one on each side |
| Center support bracket | Shades wider than 72 inches |
| Hold-down bracket | Bottom of shade on doors or in windy areas |
Step 3. Power the motor and set limits
With the shade mounted and brackets secure, the next job is getting the motor running and telling it where to stop. This step varies more than any other in a motorized shades installation, because battery-operated and hardwired motors follow completely different setup paths. Read through both subsections below and follow only the one that applies to your shade.
Connect the power source
Battery-operated shades are the simpler path. Most use a rechargeable lithium battery pack that either clips into one end of the roller tube or slides into a dedicated housing on the side bracket. Charge the battery fully before you connect it. A fully charged pack gives you the cleanest motor performance during the limit-setting process, and a partially charged battery can cause the shade to stop early or behave erratically.
Hardwired shades connect to a low-voltage transformer that plugs into a standard outlet or is wired directly into your home’s electrical system by a licensed electrician. Locate the motor’s power lead coming out of the tube end, connect it to the transformer output using the connector that came with your shade, and then plug the transformer into the outlet. Do not power the motor until the shade is fully mounted in the brackets.
Never connect a hardwired shade motor to power while the tube is still on the floor or a work surface. The motor can spin the tube and damage the fabric before you have a chance to stop it.
Set the upper and lower limits
Motor limits define the two stop points where your shade halts at full open and full close. Setting them correctly protects the motor from straining against the tube stops at either end. Most residential motors use one of two approaches: automatic limit detection (the motor senses resistance and sets limits on its own) or manual programming through a remote button sequence.
| Method | How it works | Common brands |
|---|---|---|
| Auto-detection | Press and hold the program button; motor runs and sets limits automatically | Somfy, Neolux |
| Manual programming | Press up/down to position shade, then confirm each limit with a hold sequence | Lutron, generic RF motors |
Check your manual for the exact button sequence, then run through one full test cycle before moving on to the final troubleshooting step.
Step 4. Test, troubleshoot, and maintain
The physical work is done, but your motorized shades installation isn’t complete until you’ve run a full test and confirmed everything responds correctly. This step catches problems while fixes are still easy, before the shade is in daily use and a small issue turns into a bigger one.
Run a full test cycle
Trigger the shade to close fully using your remote or app, then watch the entire travel path. The fabric should move smoothly without wobbling side to side or catching on the bracket hardware. Next, open it all the way and confirm it stops cleanly at the upper limit without the motor straining or the tube grinding against the brackets.
Check the level of the hem bar (the weighted bottom rail) when the shade is fully closed. If one side sits lower than the other, your brackets aren’t perfectly level, or one limit is set slightly off. Adjust the bracket position or re-run the limit-setting sequence before you call the install finished.
Fix common issues
Most problems that show up during testing have a straightforward fix. Use the table below to match the symptom to the solution:
| Symptom | Likely cause | Fix |
|---|---|---|
| Shade stops short of the sill | Lower limit set too high | Re-run limit programming, extend the lower stop |
| Shade won’t respond to remote | Remote not paired or battery dead | Follow pairing sequence in the manual; replace remote battery |
| Fabric bunches on one side | Roller tube not seated evenly in brackets | Remove, reseat, and snap brackets closed again |
| Motor hums but shade doesn’t move | Power connection is loose | Check battery contacts or transformer connector |
If the motor runs but the shade travels in the wrong direction, most RF motors let you reverse the direction by holding the program button for five seconds and confirming with a short press.
Keep the motor running long-term
Battery-operated shades need a recharge every three to six months depending on how frequently you operate them. Most motors display a low-battery signal by running slightly slower or stopping before the set limit. Charge the pack fully before that behavior becomes a regular pattern.
Wipe the fabric and roller tube down with a dry microfiber cloth every few months to keep dust out of the motor housing. Avoid spraying any cleaning solution directly on the tube ends where the motor sits, since moisture inside the housing shortens motor life significantly.
Next steps
You now have everything you need to complete a motorized shades installation from start to finish: accurate measurements, level brackets, a properly powered motor, and confirmed stop limits. Follow the steps in order, and you’ll avoid the most common mistakes that send installers back to square one.
If anything in the process gave you trouble, write down exactly where it happened and what the shade was doing. That detail makes troubleshooting much faster, whether you work through it yourself or bring in a professional.
For homeowners in Central Florida who’d rather skip the ladder and let an expert handle the full job, The Shutter Look has over 23 years of experience installing motorized Neolux shades with precise measurements and a clean finish every time. Reach out today and we’ll schedule a free in-home estimate so you can see your options with actual product samples in hand: contact The Shutter Look.
