


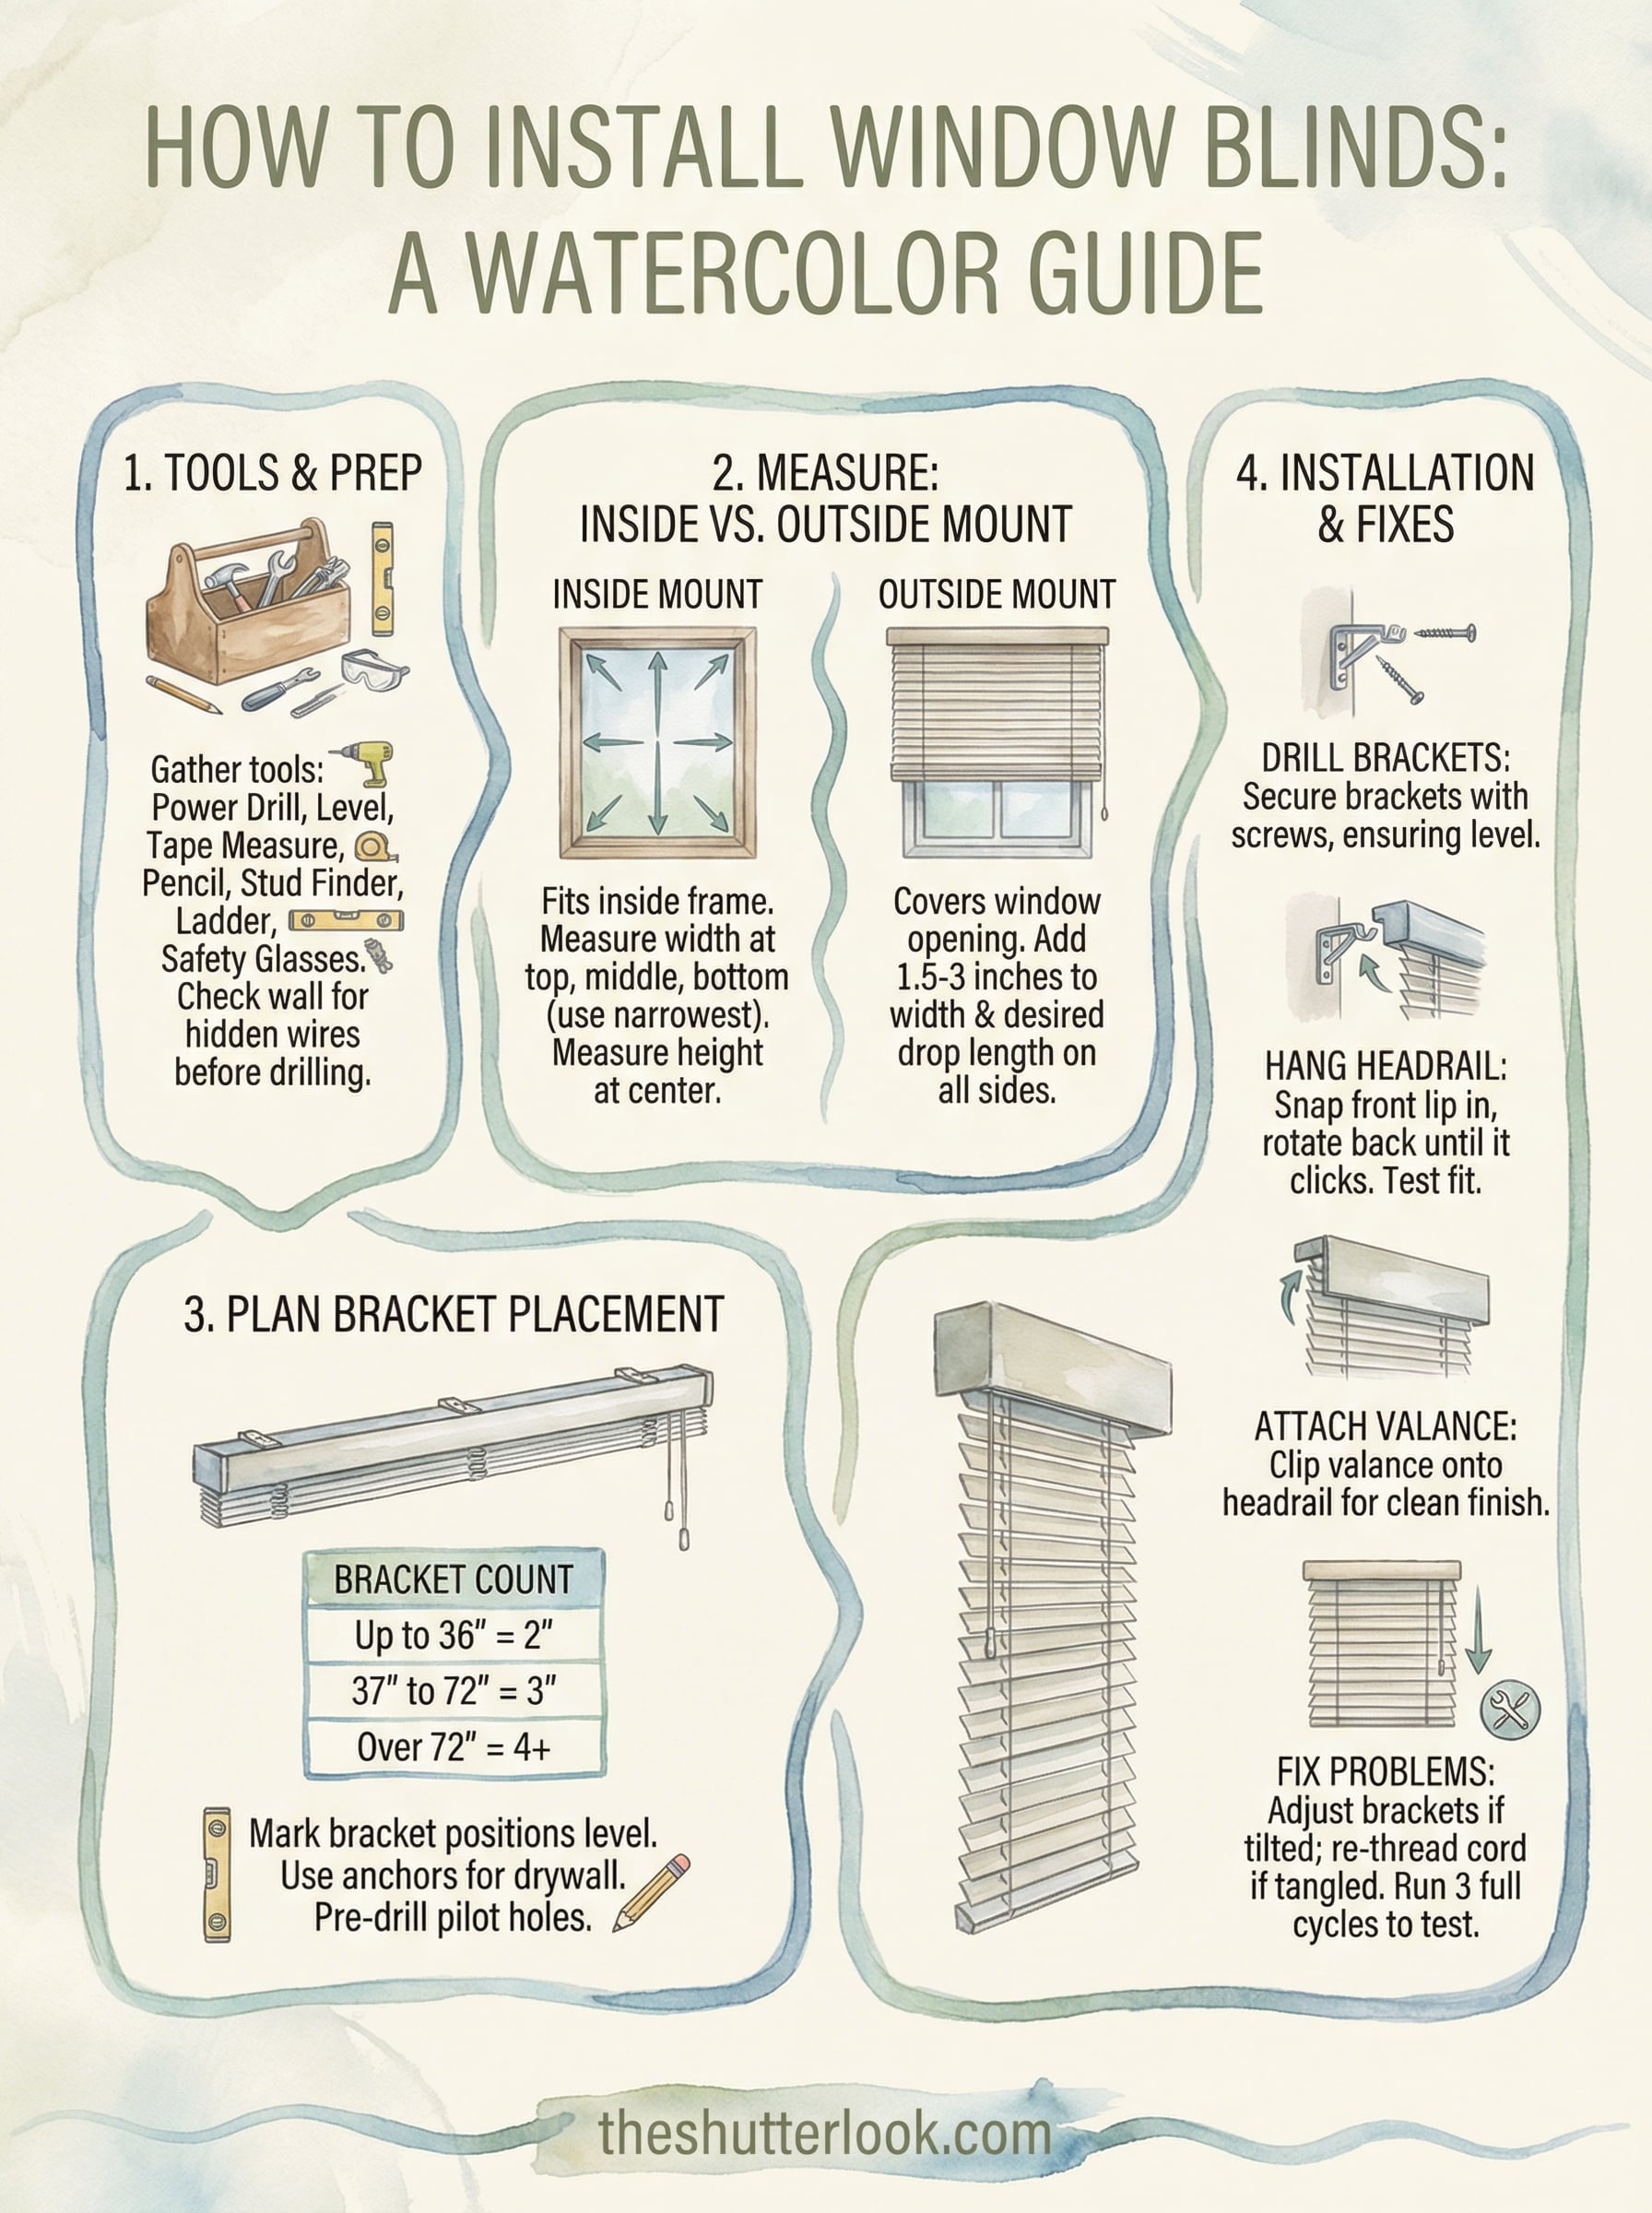
Knowing how to install window blinds yourself can save you time and money, especially if you’re comfortable with a drill, a level, and a tape measure. Most standard blinds come with everything you need in the box, and the process is straightforward enough that a first-timer can knock it out in under an hour per window.
That said, not every installation goes smoothly. Crooked brackets, incorrect measurements, and mismatched mount types can turn a simple project into a frustrating afternoon. At The Shutter Look, we’ve spent over 23 years installing window treatments across Central Florida, so we’ve seen every mistake in the book, and fixed plenty of them. That hands-on experience is exactly what shaped this guide. We want you to get it right the first time, whether you’re hanging blinds in a single room or outfitting an entire house.
Below, you’ll find a complete walkthrough covering tools, inside vs. outside mounts, and step-by-step instructions for different blind types. We’ll also point out where DIY makes sense and where calling in a professional might be the smarter move.
Tools, hardware, and safety checks before you start
Before you start learning how to install window blinds, gather everything you need in one place. Walking back and forth to find tools mid-install wastes time and increases the chance of making a measurement error. A solid setup takes about five minutes and prevents most of the problems that show up once you’re standing on a ladder with a drill in your hand.
The tools you need
Most blind installations call for a small set of common tools that you may already own. A power drill or a cordless screwdriver is the most critical item on the list since nearly every bracket system uses screws to anchor into the frame or wall. If you’re planning an outside mount that goes into drywall rather than wood, you’ll also want a stud finder to locate solid backing behind the surface.
Here’s a complete checklist to have ready before you begin:
| Tool | Why you need it |
|---|---|
| Steel tape measure (25 ft. minimum) | Accurate window measurements |
| Power drill with Phillips and flat head bits | Driving bracket screws |
| Torpedo level (9-inch) | Keeping brackets perfectly horizontal |
| Pencil | Marking bracket hole positions |
| Stud finder (AC wire detection preferred) | Locating studs and avoiding live wires |
| Ladder or step stool | Reaching windows above shoulder height |
| Safety glasses | Protecting eyes when drilling overhead |
| Painter’s tape | Preventing drill bits from walking on smooth surfaces |
Hardware that comes in the box vs. what you supply
Most blind manufacturers include the mounting brackets, screws, and valance clips in the packaging. Open the box and lay everything out flat before you pick up a drill. Compare the parts list printed in the instruction sheet against what’s physically in the box, because a missing bracket discovered halfway through the job means stopping completely.
What you supply yourself is usually wall anchors for drywall, longer screws for thick window frames, and any specialty fasteners for surfaces like tile or metal. Standard screws included in most blind kits are sized for wood window frames. If your frames are vinyl, hollow, or composite, buy plastic expansion anchors from a hardware store ahead of time so you’re not making a mid-project run.
If the supplied screws strip on the first turn or a bracket is missing from the package, contact the manufacturer before you proceed. Installing with incomplete or damaged hardware causes blinds to sag, tilt, or fall.
Safety checks before drilling
Check your wall or window frame for hidden electrical wiring or plumbing before drilling a single hole. This step matters most on outside-mount installations where you’re going into the wall itself. A stud finder with built-in AC detection will flag live wires before your drill bit reaches them, and it only adds 30 seconds to your prep.
Your ladder position is just as important as the hardware you use. Set all four feet on a flat, stable surface and keep your body centered rather than leaning to either side while drilling. On smooth surfaces like tile or painted wood, stick a strip of painter’s tape over your pencil mark before drilling. The tape gives the bit grip on contact and stops it from sliding, which protects the frame and keeps your bracket exactly where it needs to be.
Step 1. Measure for inside mount or outside mount
Measuring correctly is the most important part of learning how to install window blinds. Every bracket position, every blind width, and every drop length depends on a measurement you take before anything else gets touched. Choose your mount type first, because inside and outside mounts use completely different measuring methods.
How to measure for an inside mount
An inside mount sits inside the window frame, so the blind fits flush with the wall and shows off the frame itself. This look works best when your window has a flat, level frame at least 2.5 inches deep so the brackets have solid material to grip.
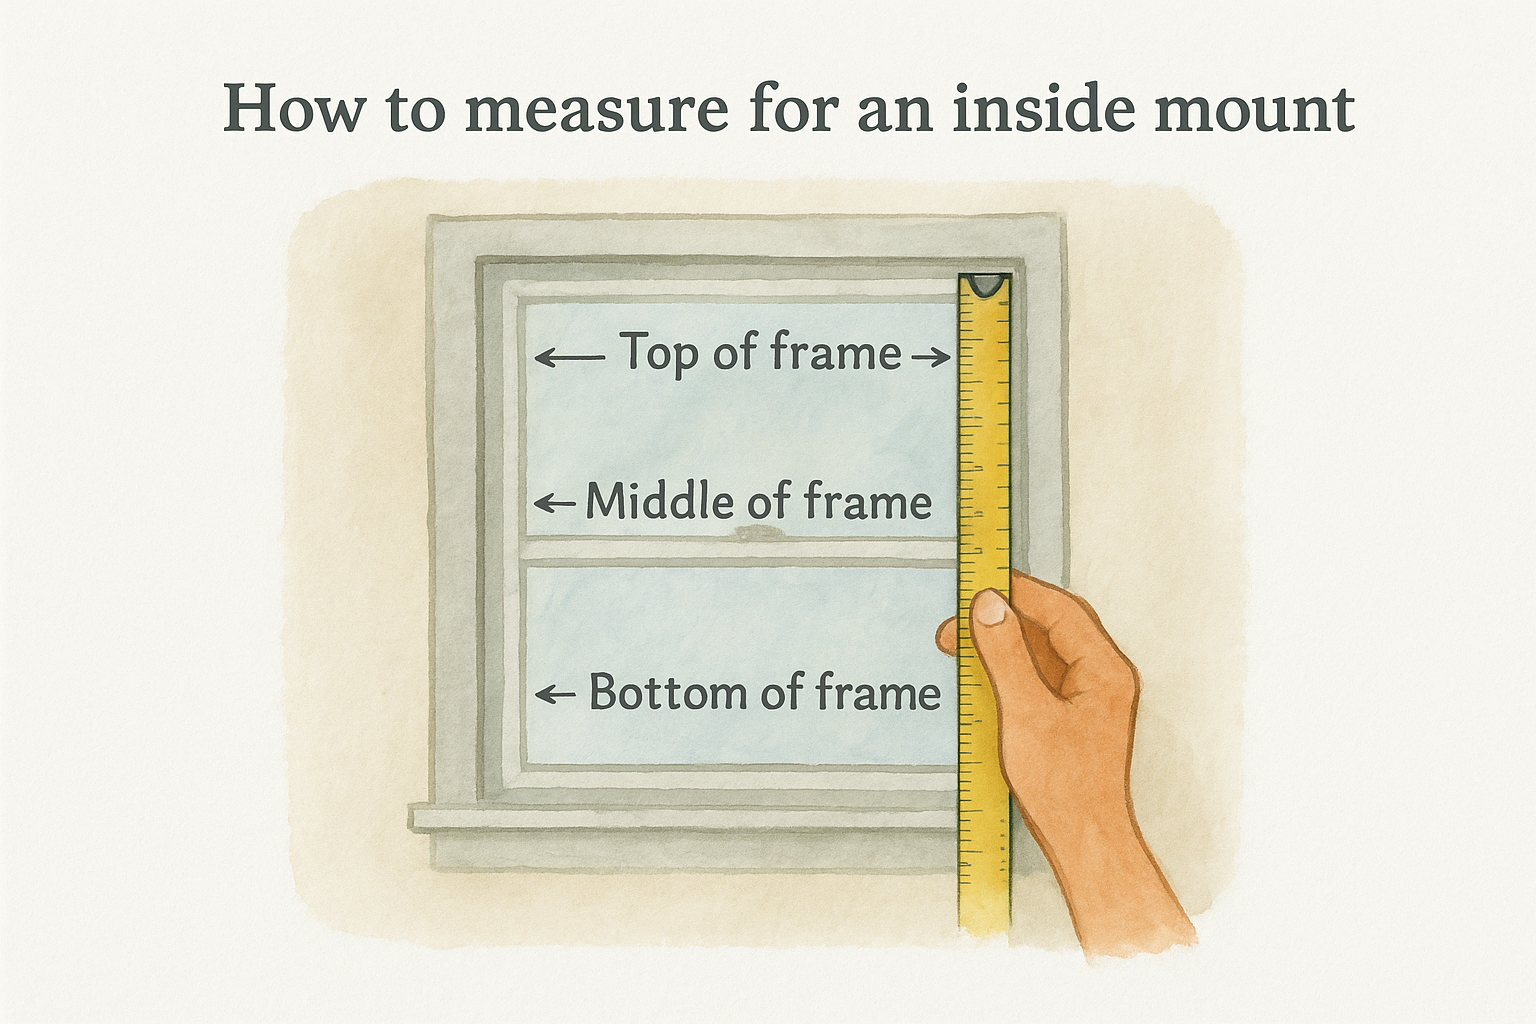
Measure the width at three points: the top, middle, and bottom of the window opening. Write all three numbers down, then use the narrowest measurement as your final width. Blind manufacturers typically deduct a small clearance (usually 1/4 to 3/8 inch) from your measurement during production, but confirm that in the product spec sheet before you order.
| Measurement point | What to record |
|---|---|
| Top of frame | Width in inches, to the nearest 1/8 inch |
| Middle of frame | Width in inches, to the nearest 1/8 inch |
| Bottom of frame | Width in inches, to the nearest 1/8 inch |
| Final width to order | The narrowest of the three numbers above |
For the drop (height), measure from the top of the inside frame straight down to the sill. Take this measurement at the center of the window for the most accurate reading.
Never round your measurements up on an inside mount. Even 1/4 inch too wide means the blind will not fit into the opening at all.
How to measure for an outside mount
An outside mount covers the full window opening and extends beyond the frame on all sides. You control the exact width and drop, which gives you more flexibility than an inside mount and lets you block more light by extending past the frame.
Add at least 1.5 to 3 inches on each side of the window opening to your width measurement so the brackets land on solid frame or wall. For the drop, measure from the point where you plan to mount the headrail down to where you want the blind to end, usually one to two inches below the sill.
Step 2. Plan bracket placement on any surface
Once you have your measurements, the next task is figuring out exactly where each bracket goes before you drill a single hole. Rushing this step is how most DIY installs end up with a blind that tilts to one side or a headrail that sags in the middle under the weight of the slats. Take five minutes to plan your bracket positions before touching your drill, and the actual installation becomes almost automatic.
Bracket spacing rules for different blind widths
The number of brackets your blind needs depends directly on how wide the headrail is. Narrow blinds up to 36 inches wide typically need only two brackets, one at each end. Wider blinds require a center support bracket to prevent the headrail from bowing, so always count your brackets before you start marking holes.
Use this guide to determine bracket count before you mark any positions:
| Blind width | Minimum brackets needed |
|---|---|
| Up to 36 inches | 2 (one at each end) |
| 37 to 72 inches | 3 (one at each end, one center) |
| Over 72 inches | 4 or more (evenly spaced) |
Always check your manufacturer’s instruction sheet first, since some headrail designs call for an extra bracket regardless of width.
How to mark brackets on wood, drywall, and vinyl
Different surfaces require different approaches when you mark bracket positions. On a solid wood frame, you can mark directly with a pencil and drive screws straight in without extra hardware. On drywall, you need to locate a stud or pre-drill a pilot hole sized for a plastic wall anchor before committing to any marks.
Vinyl window frames are the surface that trips up most people when they learn how to install window blinds. Vinyl frames are hollow in most cases, so standard screws will not grip properly and can split the material if you force them. Use a self-tapping screw or pair a short screw with a plastic expansion anchor to get a solid hold without cracking the frame.
Follow this marking sequence on any surface before you pick up a drill:
- Hold the bracket in position and trace each screw hole lightly with a pencil.
- Set the bracket aside and check your pencil marks against your torpedo level.
- Adjust the marks if needed before drilling anything.
This three-step sequence catches any shift that happened while you were holding the bracket in place, keeping every bracket perfectly level before the hardware goes in.
Step 3. Install brackets and hang the headrail
With your bracket positions marked and confirmed with a level, you’re ready to drill. This is where the physical install of how to install window blinds actually begins, and the work goes fast if your prep in Steps 1 and 2 was accurate. Keep your torpedo level within reach throughout this step because you’ll use it one more time before the headrail goes in.
Drill pilot holes and secure each bracket
Start every bracket location with a pilot hole slightly smaller than your screw diameter to prevent the frame from splitting when you drive the fastener home. For wood frames, a 1/16-inch or 3/32-inch bit is enough to guide the screw without removing too much material. On drywall where you’re not hitting a stud, drill to the depth of your anchor, tap the anchor flush with a rubber mallet, then drive the screw through the bracket directly into the anchor.
Follow this bracket installation sequence for every position:
- Drill your pilot hole at the pencil mark.
- Position the bracket over the hole and hold it flat against the surface.
- Drive the first screw until it’s snug but not fully tightened.
- Check level across the bracket face before driving the second screw.
- Tighten both screws fully once the bracket sits level and flush.
Tighten screws firmly but stop before the bracket face starts to warp or bow inward, since overtightening on vinyl and hollow frames cracks the material.
Snap the headrail into the brackets and test
Once all brackets are secure, lift the headrail and hook the front lip into the front channel of each bracket first. Rotate the back of the headrail upward until you hear or feel a click from each bracket’s locking tab. If one bracket doesn’t click, the headrail is either tilted or the bracket isn’t seated at the right depth. Back it out and re-check that specific bracket’s position.
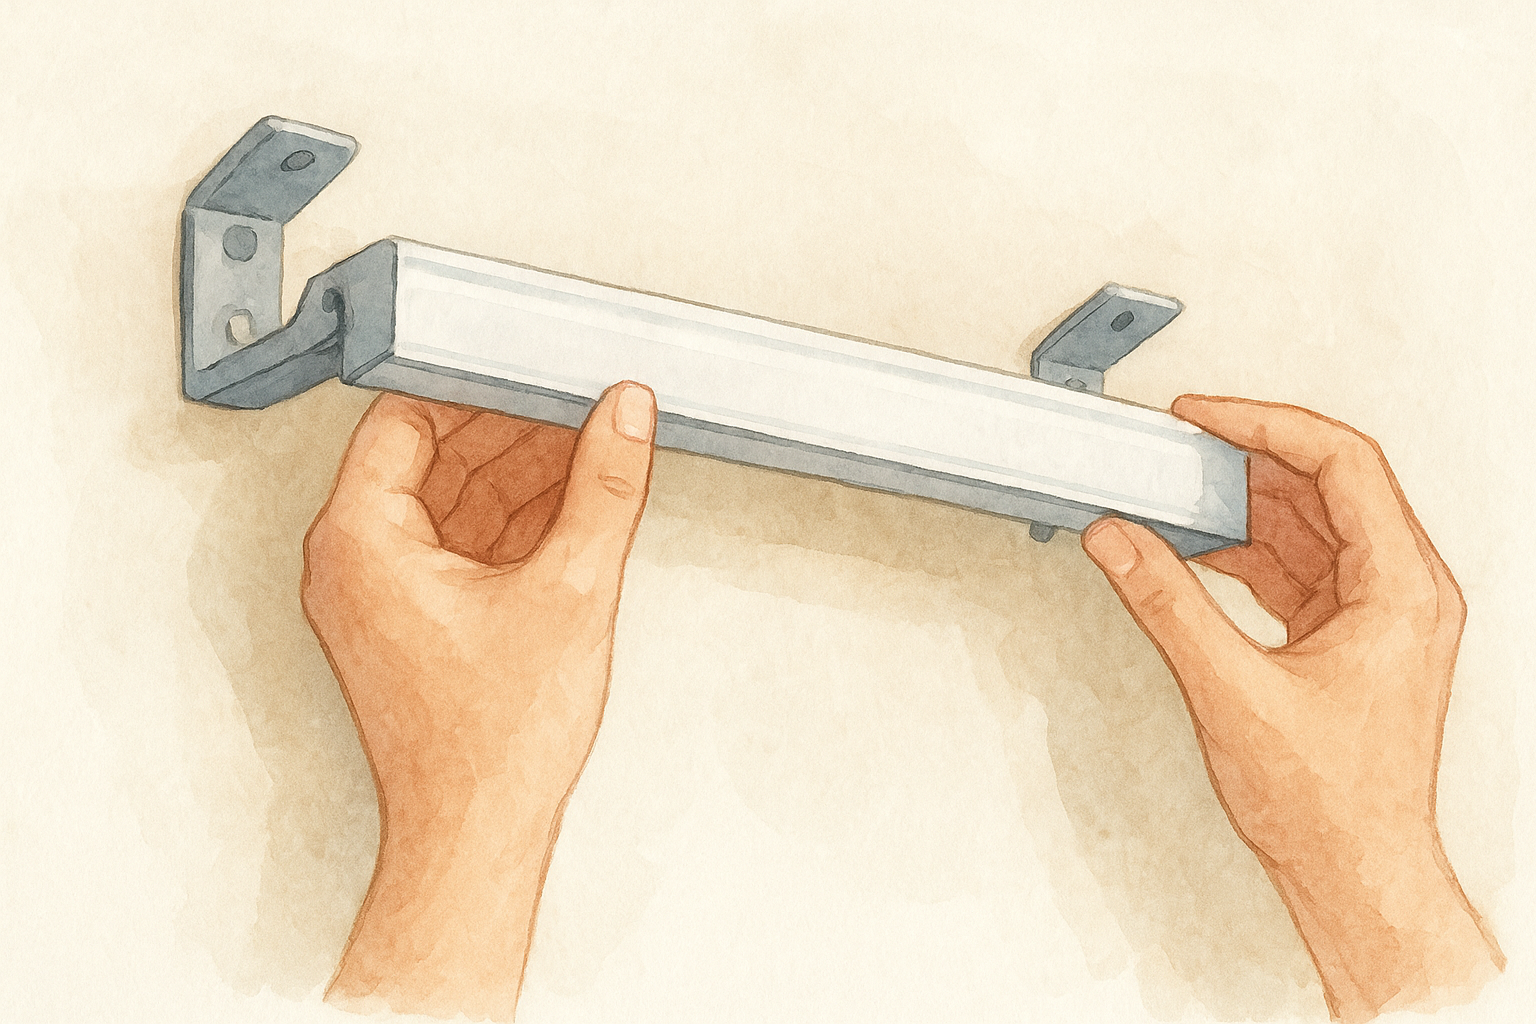
After the headrail is locked in, give it a firm downward tug at the center to confirm none of the brackets shift or pull away from the surface. Slide the slats or fabric through a full raise-and-lower cycle to make sure the blind travels straight without catching on the frame. Fix any wobble now by adjusting the bracket that’s causing the issue before you move to finishing the installation.
Step 4. Finish the blind and fix common problems
With the headrail locked in and confirmed level, the final step in how to install window blinds covers two things: attaching the valance to give the headrail a clean finish, and correcting any small problems that show up during your first test cycle. Both tasks take under five minutes each if you know exactly what to look for before stepping off the ladder.
Attach the valance and close the headrail
The valance is the decorative strip that clips to the front of the headrail and hides the brackets and hardware from view. Most valances use plastic clips that snap into pre-cut slots along the top of the headrail. Press each clip into its slot until it sits flush, then slide the valance onto the clips from one end to the other. Hold the valance flat against the headrail as you work across each section to avoid warping the strip or leaving a visible gap at either end.
If your valance won’t sit flush on one side, check that the bracket on that end isn’t sitting proud of the headrail face. Back the screw out a quarter turn, re-seat the bracket flush to the surface, and snap the valance back on.
Fix the most common installation problems
Even a careful install can produce a few small issues during the first raise-and-lower test. Most problems trace back to one bracket being slightly off, and fixing that single bracket resolves the issue completely. Run the blind through a full cycle first and note every symptom you see, then work through this table to match each problem to its fix before assuming anything is wrong with the blind itself.
| Problem | Most likely cause | Fix |
|---|---|---|
| Blind tilts left or right | One bracket sits higher than the other | Loosen the low bracket, shim it up with a thin washer, re-tighten |
| Headrail sags in the center | Missing center support bracket | Add a third bracket at the midpoint of the headrail |
| Slats catch on the frame | Blind ordered too wide for inside mount | Trim the end caps or switch to an outside mount |
| Blind won’t raise evenly | Lift cord tangled in the drum | Lower the blind fully, re-thread the cord through the drum channel |
| Valance gap on one end | Bracket sits too far forward | Push bracket flush to surface, re-snap the valance |
After you resolve any issues from the table, run the blind through three complete cycles (raise fully, lower fully, tilt open, tilt closed) to confirm smooth, consistent operation. A blind that travels straight and holds position at each stop is installed correctly and ready for daily use.
A simple way to get it done right
Following these steps gives you a solid foundation for how to install window blinds on any standard window in your home. With accurate measurements, properly spaced brackets, and a level on hand, most installs wrap up in under an hour and hold up for years without issue.
Some windows make the job harder than it looks. Odd frame depths, arched openings, or wide spans over 72 inches all introduce variables that a basic guide doesn’t fully address. When the window or product spec pushes past what standard DIY covers, working with a professional saves you from rework, wasted materials, and a second trip to the hardware store.
If you’re in Central Florida and want the job done right the first time, The Shutter Look provides free in-home estimates with physical product samples and handles every step from the initial measurement through final installation, with a three-week turnaround from quote to finished job.
