


Vertical blinds are a practical, budget-friendly choice for sliding doors and wide windows, and if you’re reasonably handy, learning how to install vertical blinds yourself is a straightforward weekend project. With the right tools and a bit of patience, you can skip the installation fee and get clean, professional-looking results on your own.
That said, not every installation goes smoothly. At The Shutter Look, we’ve spent over 23 years installing window treatments across Central Florida, and we’ve seen what happens when measurements are off by even a fraction of an inch. This guide walks you through every step, from gathering your tools and taking accurate measurements to mounting brackets, hanging the headrail, and clipping in each vane, so you can avoid the most common mistakes.
Whether you’re tackling this yourself or just want to understand the process before calling in a pro, you’ll have everything you need right here.
What you need before you start
Getting your tools and materials together before you start is one of the most overlooked parts of learning how to install vertical blinds. Running out to find a drill bit halfway through the job wastes time and breaks your focus, and small interruptions like that often lead to measurement mistakes you won’t catch until the headrail is already up. Take ten minutes to collect everything below before you touch a single bracket or open the blind packaging.
Tools you’ll need
Most of what you need is standard household hardware. A power drill with a Phillips head bit is the main tool you’ll rely on, though a cordless screwdriver works if you prefer more control close to the wall surface. You’ll also need a pencil for marking bracket positions and a level to confirm everything sits straight before you drive a single screw.
Here’s a complete checklist:
- Power drill or cordless screwdriver
- Phillips head drill bit
- Tape measure
- Pencil
- Level (a 4-foot level works best for wide windows or sliding doors)
- Step ladder or sturdy stool
- Stud finder (essential for drywall installations)
- Safety glasses
A level is non-negotiable. Even a bracket that’s off by a quarter inch will cause your headrail to tilt and your vanes to hang at an uneven angle.
Materials to have ready
Before you open the blind box all the way, verify that the kit is complete. Lay out the brackets, screws, vanes, valance clips, and any wall anchors that came included. A missing bracket or a short screw count will stop your installation cold, and most hardware stores carry replacement parts if something is off.
Pay close attention to the type of anchors your kit provides. Most vertical blind packages include standard plastic drywall anchors rated for light loads, but vertical blinds on a wide sliding door track can be heavier than they look. If you’re mounting into drywall without hitting a stud, pick up toggle bolts or snap toggles before you start. For installations into a wood window frame or a ceiling mount scenario, grab wood screws that are at least one inch longer than the ones in the kit to make sure you get a solid hold. Having the right fasteners ready ahead of time keeps the job moving without any mid-project hardware runs.
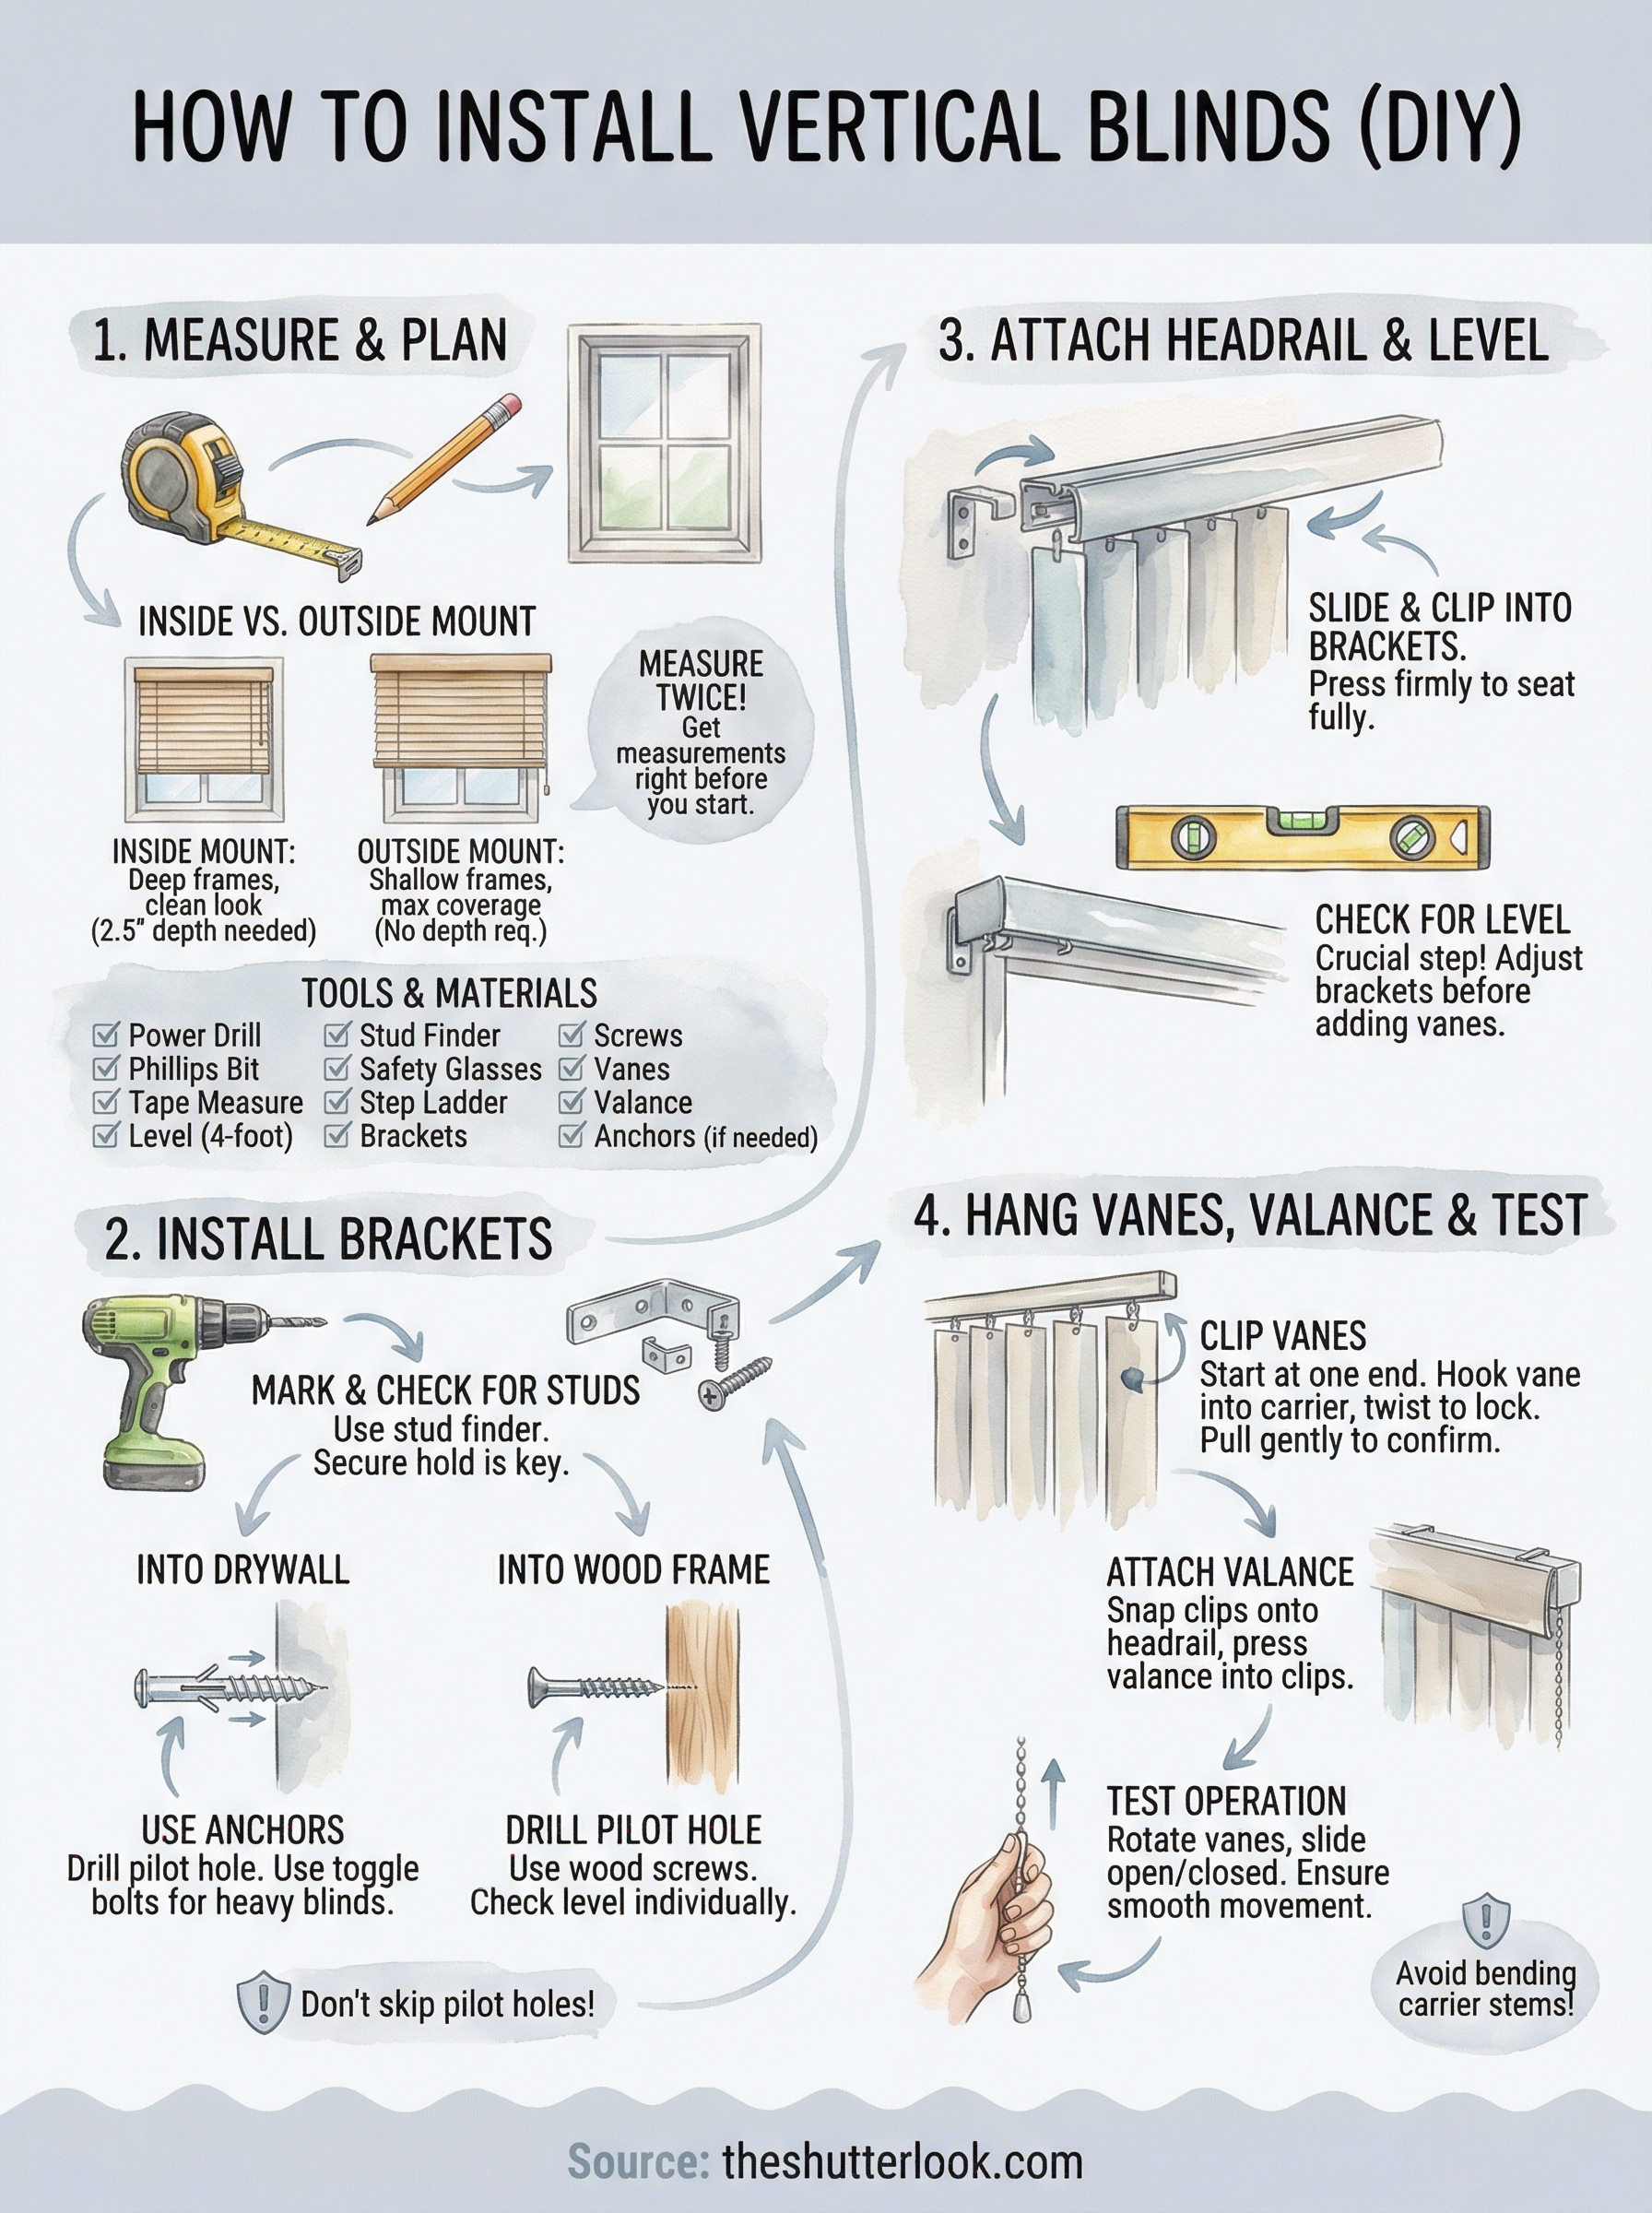
Step 1. Measure, choose mount type, and mark placement
The most important step in how to install vertical blinds is getting your measurements right before you touch a bracket or a drill. You also need to decide between an inside mount and an outside mount before you mark anything on the wall, since each choice changes where your brackets go and how many you’ll need.
Inside mount vs. outside mount
An inside mount sits within the window or door frame opening, giving a clean, recessed look. An outside mount attaches above and outside the frame, which works better when your frame is too shallow or when you want the blinds to cover a wider area for better light control.
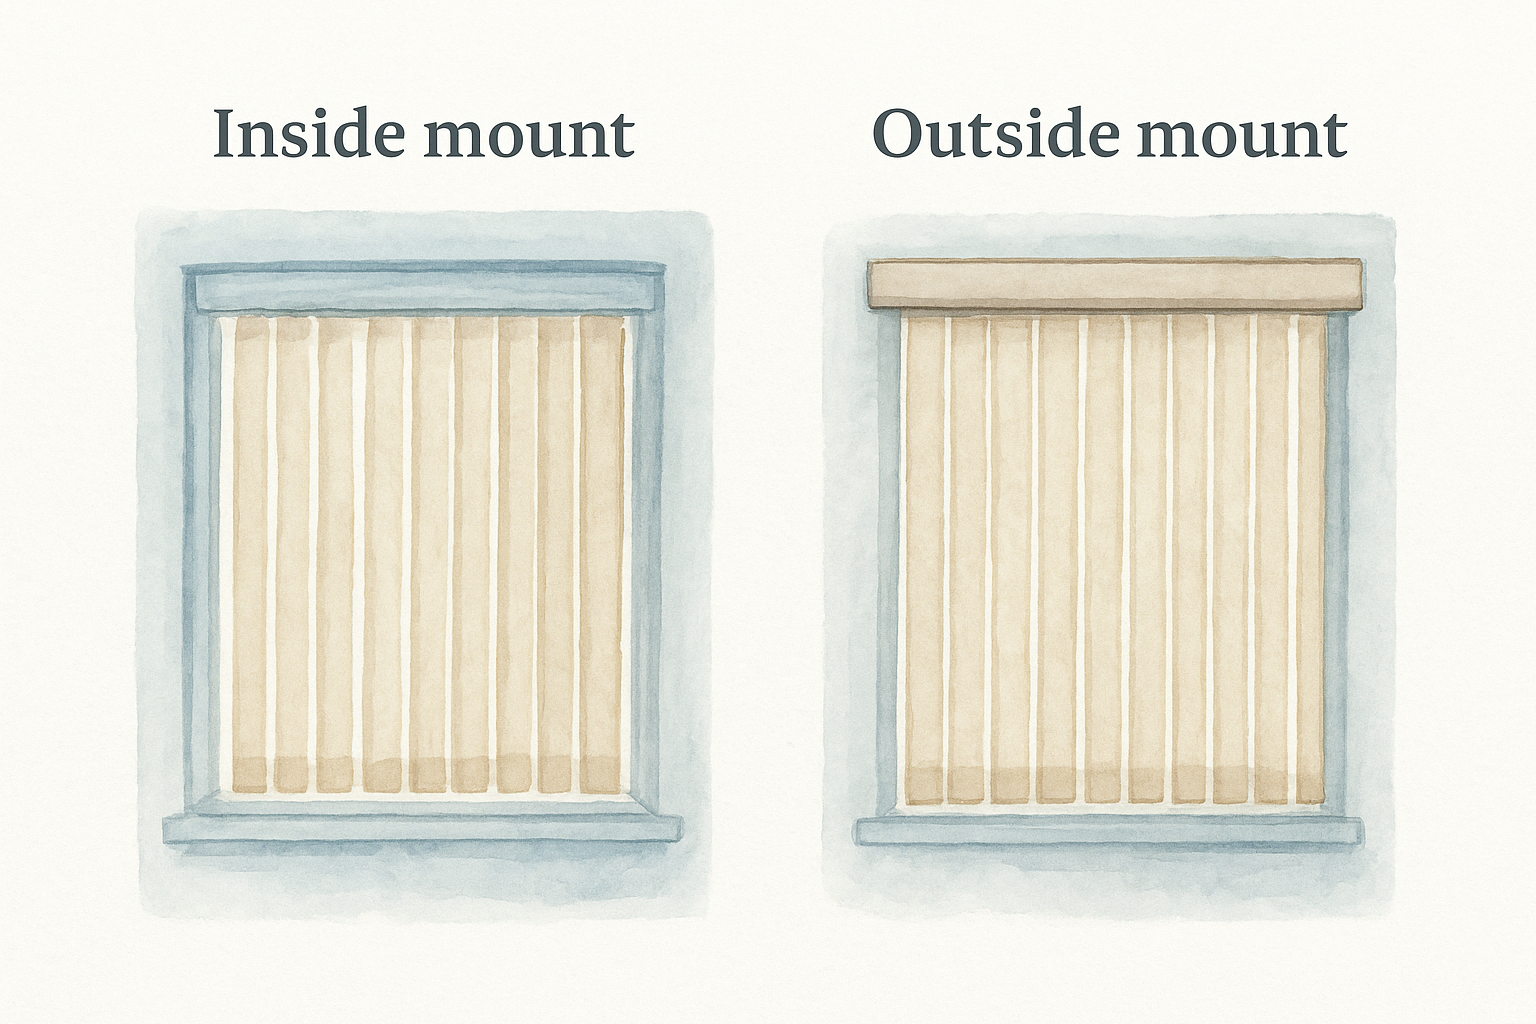
| Mount Type | Best For | Minimum Depth Needed |
|---|---|---|
| Inside mount | Deep frames, clean look | 2.5 inches |
| Outside mount | Shallow frames, maximum coverage | No depth requirement |
How to measure correctly
For an inside mount, measure the width of the opening at three points: the top, middle, and bottom. Use the narrowest measurement and round down to the nearest eighth of an inch. Measure the height from the top of the opening straight down to the floor or sill. For an outside mount, add at least two inches to each side of the frame for adequate overlap and light blockage.
Always measure twice before ordering your blinds. A headrail cut too narrow creates light gaps along the sides that no amount of vane adjustment will fix.
Mark your bracket positions
Once your measurements are confirmed, mark the bracket locations lightly in pencil on the wall or frame. Position the end brackets roughly two inches in from each end of the headrail, and space any additional center brackets no more than 48 inches apart across the full span to prevent the headrail from sagging over time.
Step 2. Install the brackets securely on your surface
With your bracket positions marked, you’re ready to drill. Before you drive a single screw, run your stud finder across each marked location to check whether it lands on a stud. Hitting a stud gives you the strongest, most reliable hold, so adjust your bracket position by an inch or two in either direction if it gets you onto solid wood behind the drywall.
Mounting into drywall
When you can’t hit a stud, drywall anchors are your backup option, but choose them carefully. The plastic anchors that come in most vertical blind kits are fine for lightweight blinds over a small window, but wide sliding door installations put more stress on the brackets. For anything over six feet wide, use toggle bolts or snap toggles rated for at least 50 pounds each. Drill a pilot hole sized to match your anchor, tap or thread the anchor into place, then drive the bracket screw firmly until the bracket sits flush against the wall with no movement.
Never skip the pilot hole. Forcing a screw into drywall without one splits the anchor and gives you a hold that will fail under load.
Mounting into wood or a window frame
Wood installations are the most straightforward part of how to install vertical blinds. You don’t need anchors at all. Drill a pilot hole slightly smaller than your screw diameter to prevent splitting, then drive wood screws directly through each bracket hole into the frame. Check each bracket individually with your level before moving to the next one, and give every screw a firm final tighten to make sure nothing shifts when the headrail weight settles in.
Step 3. Attach the headrail and confirm it sits level
With all brackets secure, lift the headrail up to your brackets and slide it into place. Most vertical blind headrails snap or clip into the bracket channel from the front, though some designs require you to tilt the rail at a slight angle before pressing it flush. Check your instruction sheet to confirm the correct loading direction before applying any pressure, since forcing the headrail in the wrong direction can crack the bracket housing and compromise the entire hold.
Sliding the headrail into position
Hold the headrail at each end as you raise it, or have a second person support the center if you’re covering a wide sliding door. Once the headrail clicks into each bracket, run your hand across the full length and press firmly at every bracket point to confirm each connection is fully seated. A headrail that’s only partially clipped on one end will shift the moment you start hanging vanes, so verify every bracket snaps completely before you continue.
Checking and adjusting the level
Place your level directly on top of the seated headrail and check the bubble across its full length. Small adjustments at this stage are simple: loosen the screw on the low bracket, nudge it up or down slightly, then re-tighten. This checkpoint is the most critical step in how to install vertical blinds because a headrail that’s even slightly off causes every vane to hang at a visible, uneven angle.
Fix the level now, before the vanes go on. Correcting a tilted headrail after the vanes are clipped in means removing everything and repeating this entire step.
Step 4. Hang the vanes, add the valance, and test operation
With a level headrail locked into place, you’re ready for the final stage of how to install vertical blinds: hanging the vanes and confirming everything operates correctly. This step moves quickly, but rushing through the vane attachment is where most DIYers end up with uneven spacing or damaged carriers, so take your time.
Clipping in the vanes
Start at one end of the headrail and work your way across in order. Each vane has a hook at the top that slides into the carrier stem, and most designs require a short clockwise twist to lock the vane in place. Once you clip in a vane, give it a firm downward pull to confirm it’s fully seated before moving to the next carrier. Spacing will be automatic since the carriers are pre-set inside the headrail, but verify the vanes hang parallel as you go and straighten any that look twisted at the clip point.
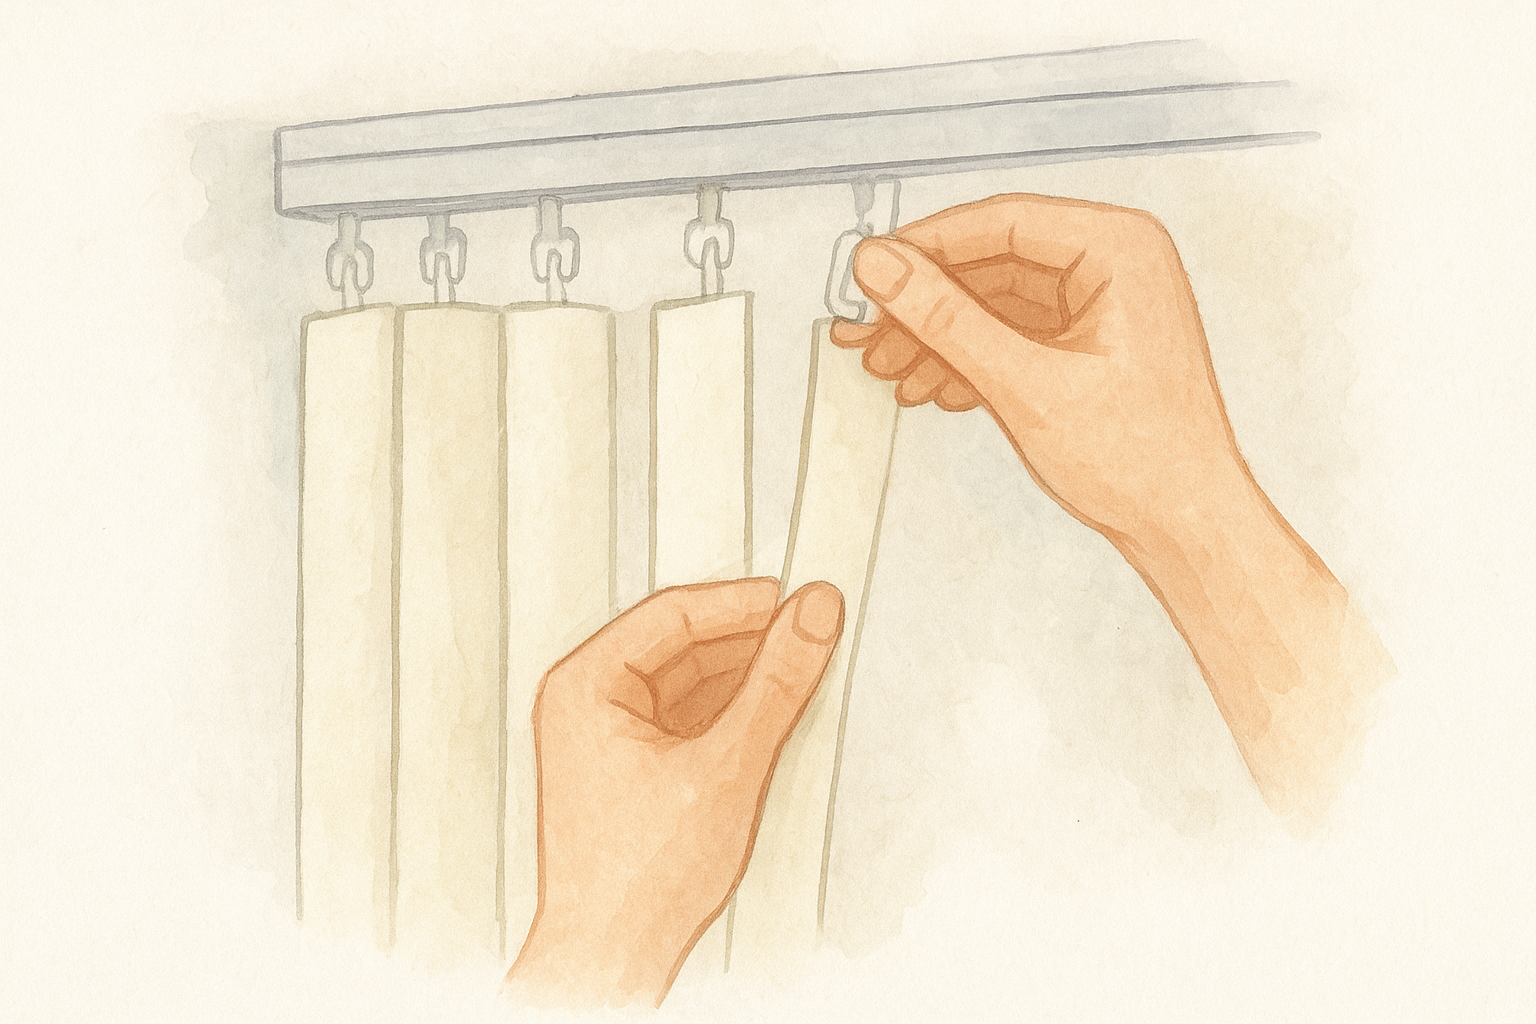
Never yank a vane to force it onto a carrier. A bent carrier stem will prevent that vane from rotating properly, and replacing individual carriers after installation is a frustrating fix.
Attaching the valance
The valance covers the exposed headrail and bracket hardware at the top of your blinds. Snap the valance clips onto the front lip of the headrail first, then press the valance panel into those clips from front to back until each clip locks. Run your hand across the full valance length to confirm no clips are partially engaged, since a loose section will rattle every time you open or close the blinds.
Testing the operation
Pull the control chain or wand gently to rotate the vanes open and closed, then slide the entire stack to each side. Every vane should rotate smoothly and stack without overlapping at the end. If a single vane resists rotation or hangs at a different angle than the rest, remove it, check the carrier stem for damage, and re-clip it before considering the installation complete.
Quick recap and next step
Now you know exactly how to install vertical blinds from start to finish. You measured your window, chose your mount type, secured your brackets into solid material, locked the headrail into place, and confirmed it was level before hanging a single vane. Following those steps in order is what separates a clean, long-lasting installation from one that wobbles, tilts, or fails within a few months.
That said, DIY installation works best when your window dimensions are standard and your walls give you solid mounting points. Tricky ceiling mounts, unusually wide sliding doors, or older window frames can turn a straightforward job into a frustrating one. If you run into any of those situations, or if you simply want the job done right the first time without the guesswork, the team at The Shutter Look can handle the full project, from precise measurements to professional installation, in about three weeks.
