


Cordless blinds are one of the most popular window treatments we install at The Shutter Look, and for good reason. They’re clean, safe for homes with kids and pets, and straightforward to set up yourself. If you’re wondering how to install cordless blinds, you’re probably closer to a finished project than you think. Most homeowners can get this done in under 30 minutes per window with a few basic tools.
The biggest decision you’ll face before picking up a drill is choosing between an inside mount and an outside mount. Each method changes how you measure, where you place your brackets, and how the final result looks. Get it right, and your blinds will operate smoothly for years. Get it wrong, and you’ll deal with gaps, rubbing, or a fit that just looks off.
With over 23 years of installing window treatments across Central Florida, we’ve seen every mistake in the book, and fixed most of them. This guide walks you through both mounting options step by step, covers the tools you’ll need, and shares the measuring techniques we use on every job so you can get a professional result on your own.
What you need before you start
Before you figure out how to install cordless blinds, gather everything you’ll need so you’re not hunting for tools mid-project. Most windows take 15 to 30 minutes once you’re set up, but that time doubles if you’re making trips back to the garage. Having the right materials on hand also reduces the chance of making a measuring mistake you can’t undo.
Tools you’ll need
A short list of common tools covers the entire installation. You don’t need anything specialized, and most of these are already in a standard home toolbox.
- Power drill or screwdriver (a cordless drill speeds things up significantly)
- Tape measure (steel, at least 1 inch wide for accurate readings)
- Pencil for marking bracket positions
- Level (a small 9-inch level works well for single windows)
- Phillips head drill bit or screwdriver bit
Measure twice, mark once. A misplaced bracket hole is harder to fix than a misread tape measure.
What comes in your blind’s box
Every cordless blind package includes the components you need to mount it. Before you start, open the box and lay everything out so nothing gets overlooked. Most manufacturers include:
- The headrail with the blind fabric or slats attached
- Mounting brackets (typically 2 for windows under 48 inches wide, 3 for wider windows)
- Screws sized for the included brackets
- A valance and clips to cover the headrail once installed
- An installation instruction sheet specific to that blind model
Check the instruction sheet first since bracket styles vary by brand. Some use a top-mount clip, others use a side-mount screw. Knowing which bracket type you have before drilling saves you from starting over with the wrong hole placement.
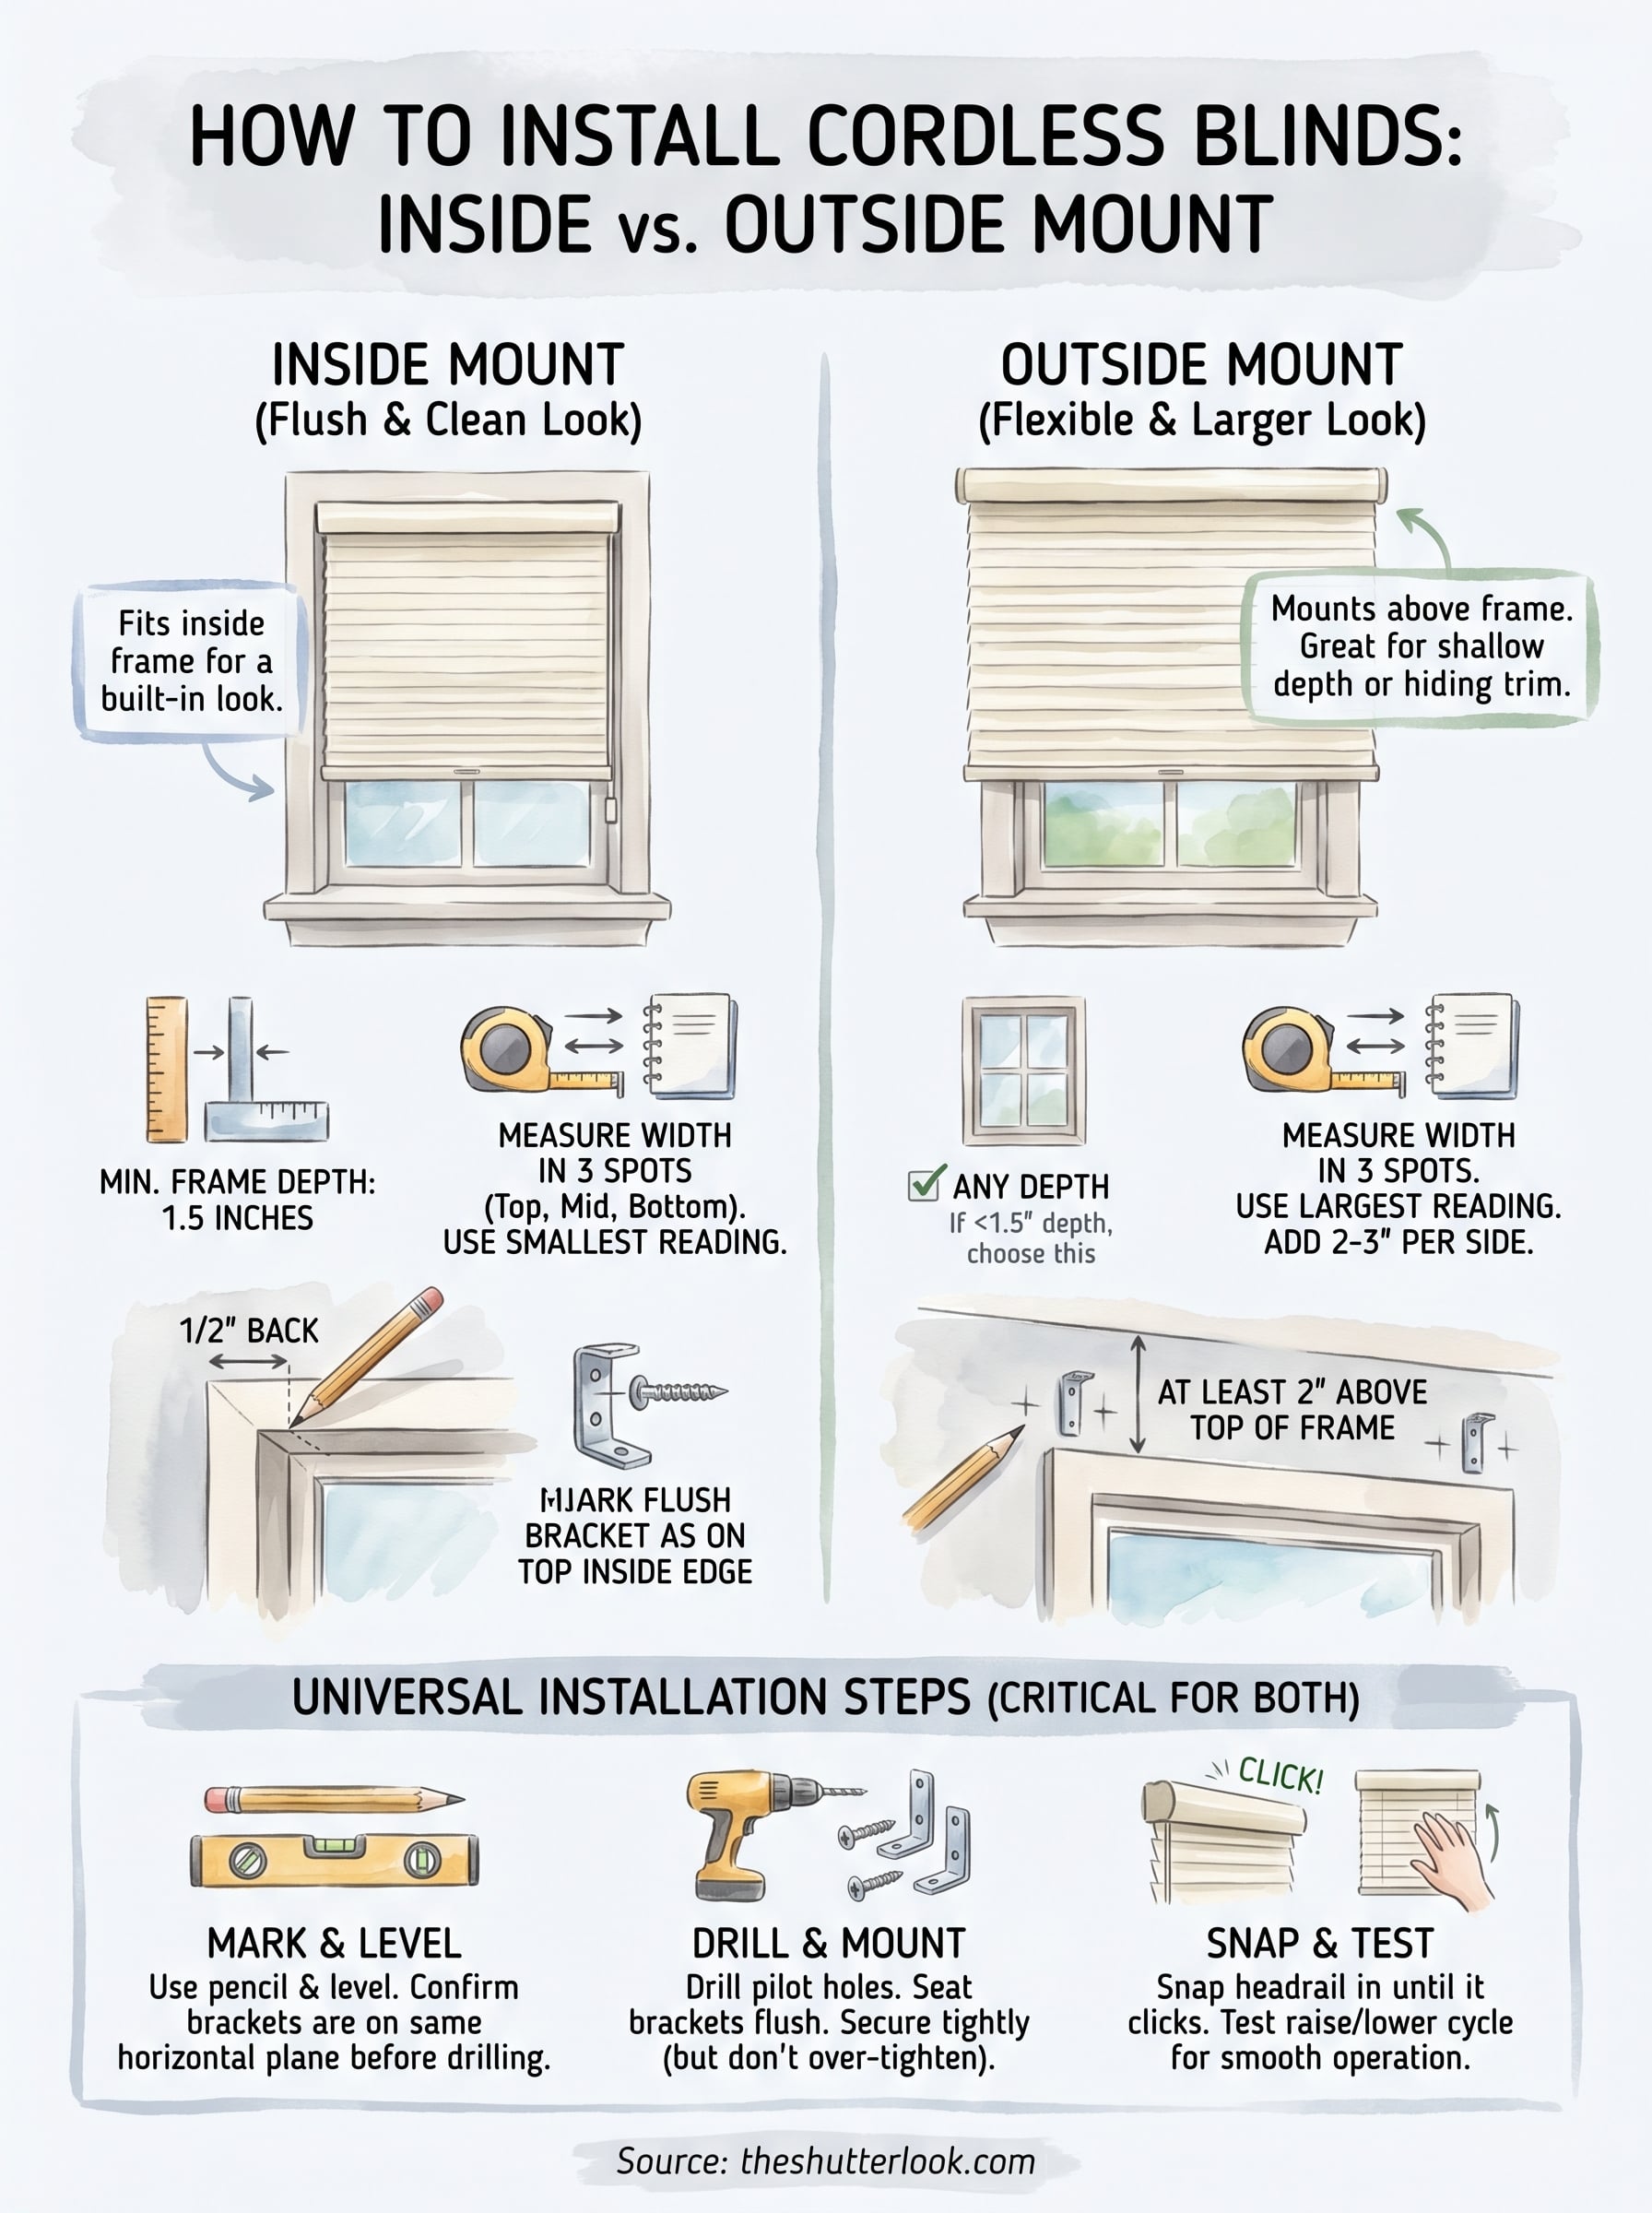
Choose inside vs outside mount
This is the decision that shapes everything else about how to install cordless blinds. Inside mount fits the blind inside the window frame for a flush, built-in look, while outside mount places the brackets above the frame on the wall or trim. Both methods work well, but picking the wrong one for your window produces gaps or proportions that look off.
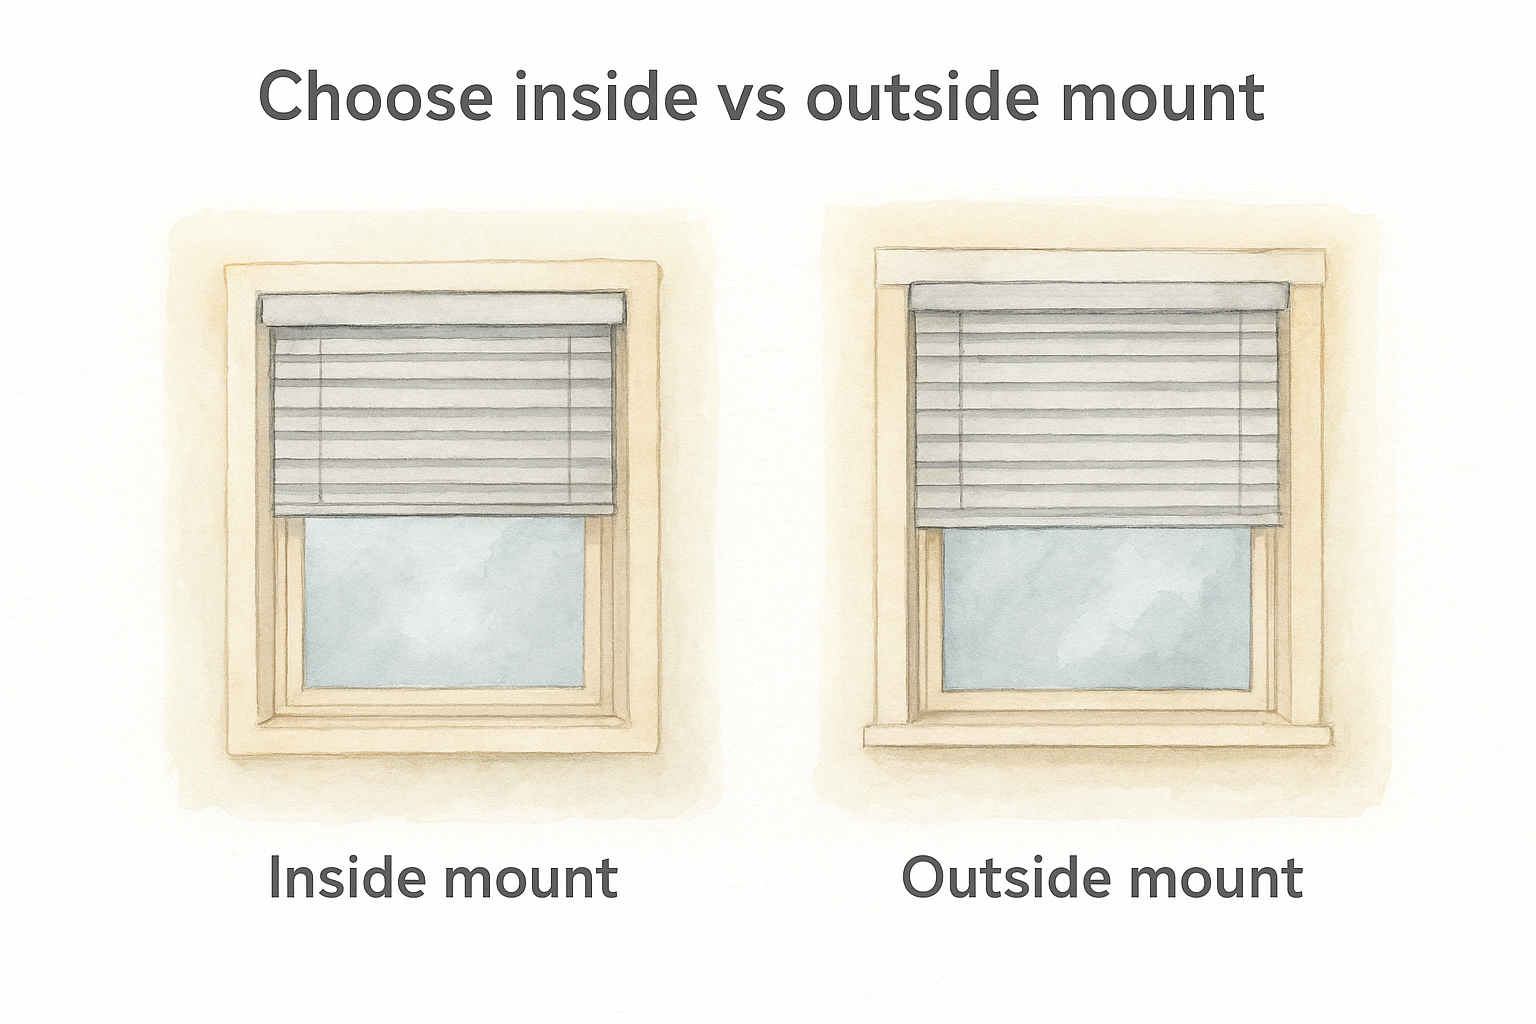
Inside mount
Inside mount gives a clean appearance that sits flush with your wall. Your window frame depth determines whether this option is possible at all, as most blinds need at least 1.5 inches of clear depth to mount without the headrail sticking out past the frame. Measure at the shallowest point of your frame before committing to this method.
If your frame depth is under 1.5 inches, outside mount is the right call.
Outside mount
Outside mount works for any window regardless of frame depth. It’s the better choice when you want to make a window appear larger or need to cover uneven or damaged trim. Place brackets at least 2 inches above the frame so the headrail clears the full top of the window opening.
Use outside mount when:
- Your frame depth is under 1.5 inches
- You want to maximize the visual size of the window
- Your trim has damage or gaps you need to hide
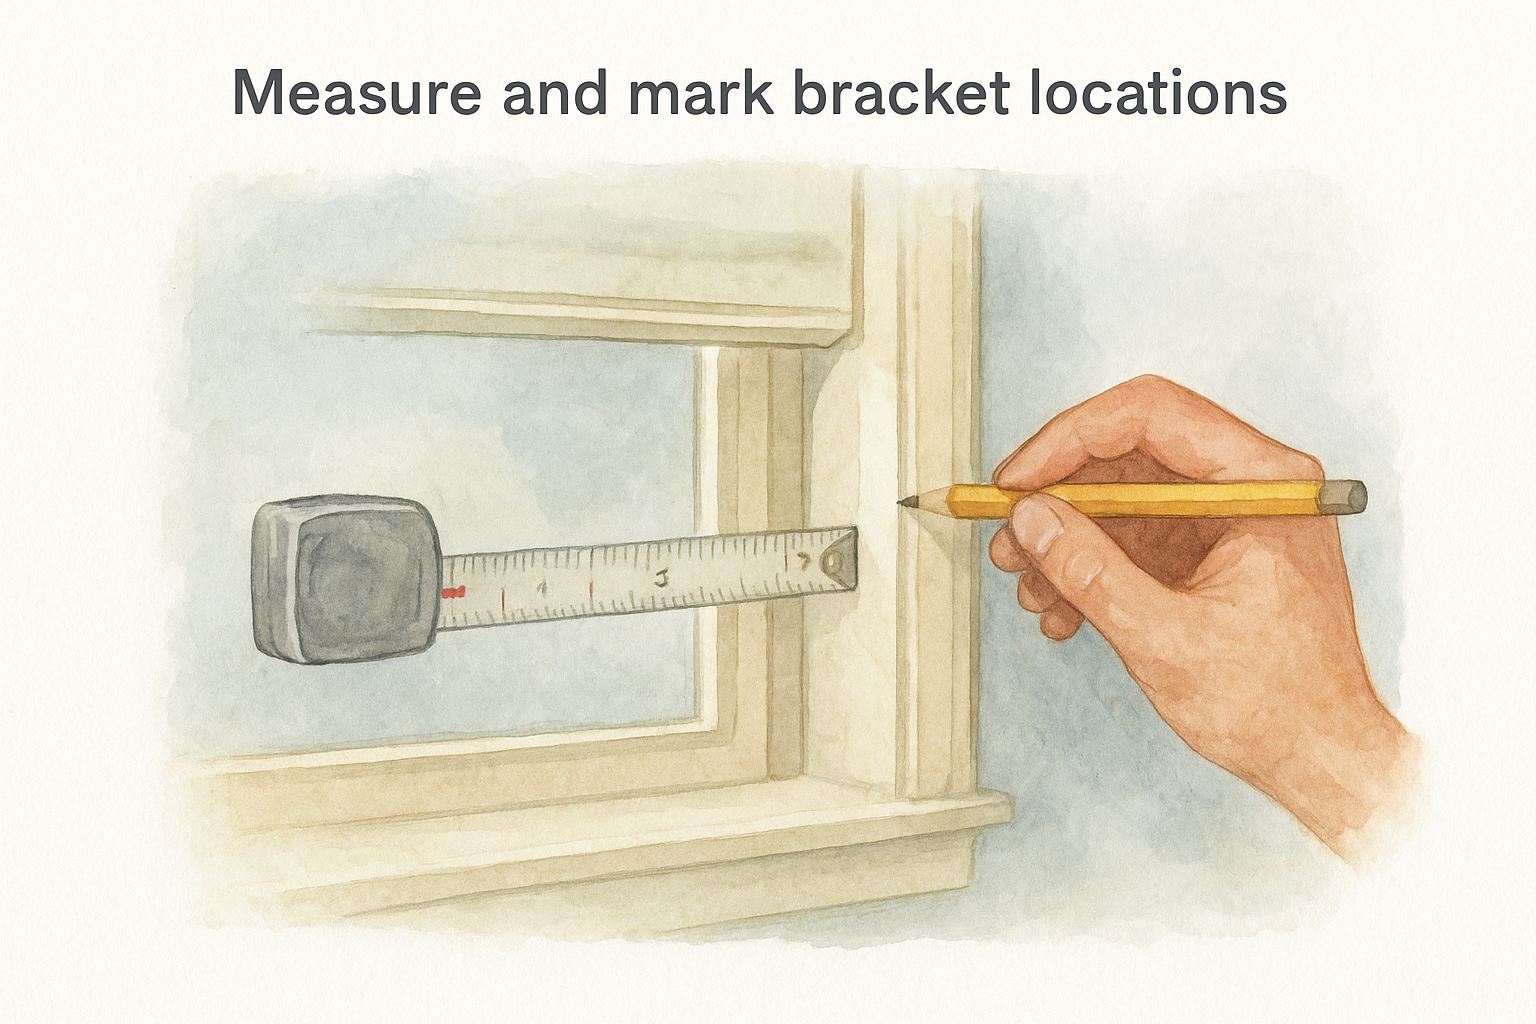
Measure and mark bracket locations
Accurate measuring prevents most installation mistakes. Measure width in three spots – top, middle, and bottom of the opening – and record the smallest reading for inside mount or the largest for outside mount. Always mark bracket positions with a pencil before drilling anything.
Inside mount measurements
Measure the exact inside width of your frame at the top, middle, and bottom. Use the narrowest reading when ordering your blind. To mark brackets, hold the headrail inside the frame, position it 1/2 inch from the front edge, and mark the screw holes with a pencil.
Double-check that your pencil marks are level before drilling – a crooked mark means a crooked blind.
Use this quick reference for inside mount marking:
- Mark brackets flush against the top inside edge of the frame
- Space a third bracket at center for blinds wider than 48 inches
Outside mount measurements
Outside mount gives you more flexibility when figuring out how to install cordless blinds. Extend your width 2 to 3 inches beyond the frame on each side and mark brackets at least 2 inches above the top of the frame opening.
Keeping both bracket marks level with each other is critical. Use your level across both pencil marks before drilling to confirm they sit on the same horizontal plane.
Install brackets and hang the headrail
With your bracket positions marked, drilling is the straightforward part of learning how to install cordless blinds. Drive each screw until the bracket sits flush and tight against the surface without wobbling. If you hit resistance before the screw seats fully, stop and check that you’re driving straight into the frame or wall stud.
Mount the brackets
Hold each bracket against your pencil mark and drill pilot holes first before driving the final screws, especially on wood frames. Pilot holes prevent splitting and keep screws from pulling to one side. For drywall outside mounts, use the included anchors if your screws aren’t landing in a stud.
Follow this order for clean results:
- Drill pilot holes at each pencil mark
- Seat the bracket and drive screws to snug, not overtight
- Confirm the bracket does not shift when you apply sideways pressure
Snap in the headrail
Clip or slide the headrail into your mounted brackets according to the manufacturer’s instructions. Most headrails lock in with a firm click, so apply steady pressure across the full width until both ends seat completely.
If one end clicks in but the other does not, the headrail may be bowing slightly. Lift it out, straighten it, and try again.
Level, test, and troubleshoot cordless blinds
Once the headrail is seated, checking your level and running a quick test cycle are the last steps in learning how to install cordless blinds properly. Hold your level against the bottom rail of the blind. If it reads off, loosen the bracket screws slightly, adjust, and retighten before moving on.
Test the blind operation
Raise and lower the blind three or four times to confirm it moves smoothly in both directions. The fabric or slats should stack evenly and lock at any height without drifting down on their own.
If the blind drops after you release it, the tension mechanism may need resetting. Check the manufacturer’s instructions for a reset procedure specific to your model.
Fix common issues
Most installation problems come down to bracket placement or headrail seating. Use this quick reference for the issues you are most likely to encounter:
| Problem | Likely cause | Fix |
|---|---|---|
| Blind tilts to one side | Brackets not level | Loosen, adjust, retighten |
| Headrail won’t click in | Bracket too far from edge | Reposition bracket inward |
| Blind drifts down | Low tension | Reset tension per manual |
| Slats won’t tilt evenly | Tilt rod misaligned | Reseat headrail fully |
Wrap-Up and When to Call a Pro
Now you know how to install cordless blinds from start to finish, covering both inside and outside mount options. Follow the measuring steps carefully, confirm your brackets are level before drilling, and run a test cycle after the headrail seats. Most single-window installs wrap up in under 30 minutes when you work through each step in order.
Some situations are worth handing off to a professional. If your window frame is out of square, your trim is damaged, or you’re working with large format windows that need precise custom sizing, a measurement error becomes expensive fast. The same applies if you’re considering motorized shades or specialty shutters that involve wiring or complex hardware.
If you want a guaranteed result without the guesswork, the team at The Shutter Look handles everything from the initial measurement to the final installation, and has done so for over 23 years across Central Florida.
